Making scented pinecone Christmas trees

 pineconetree

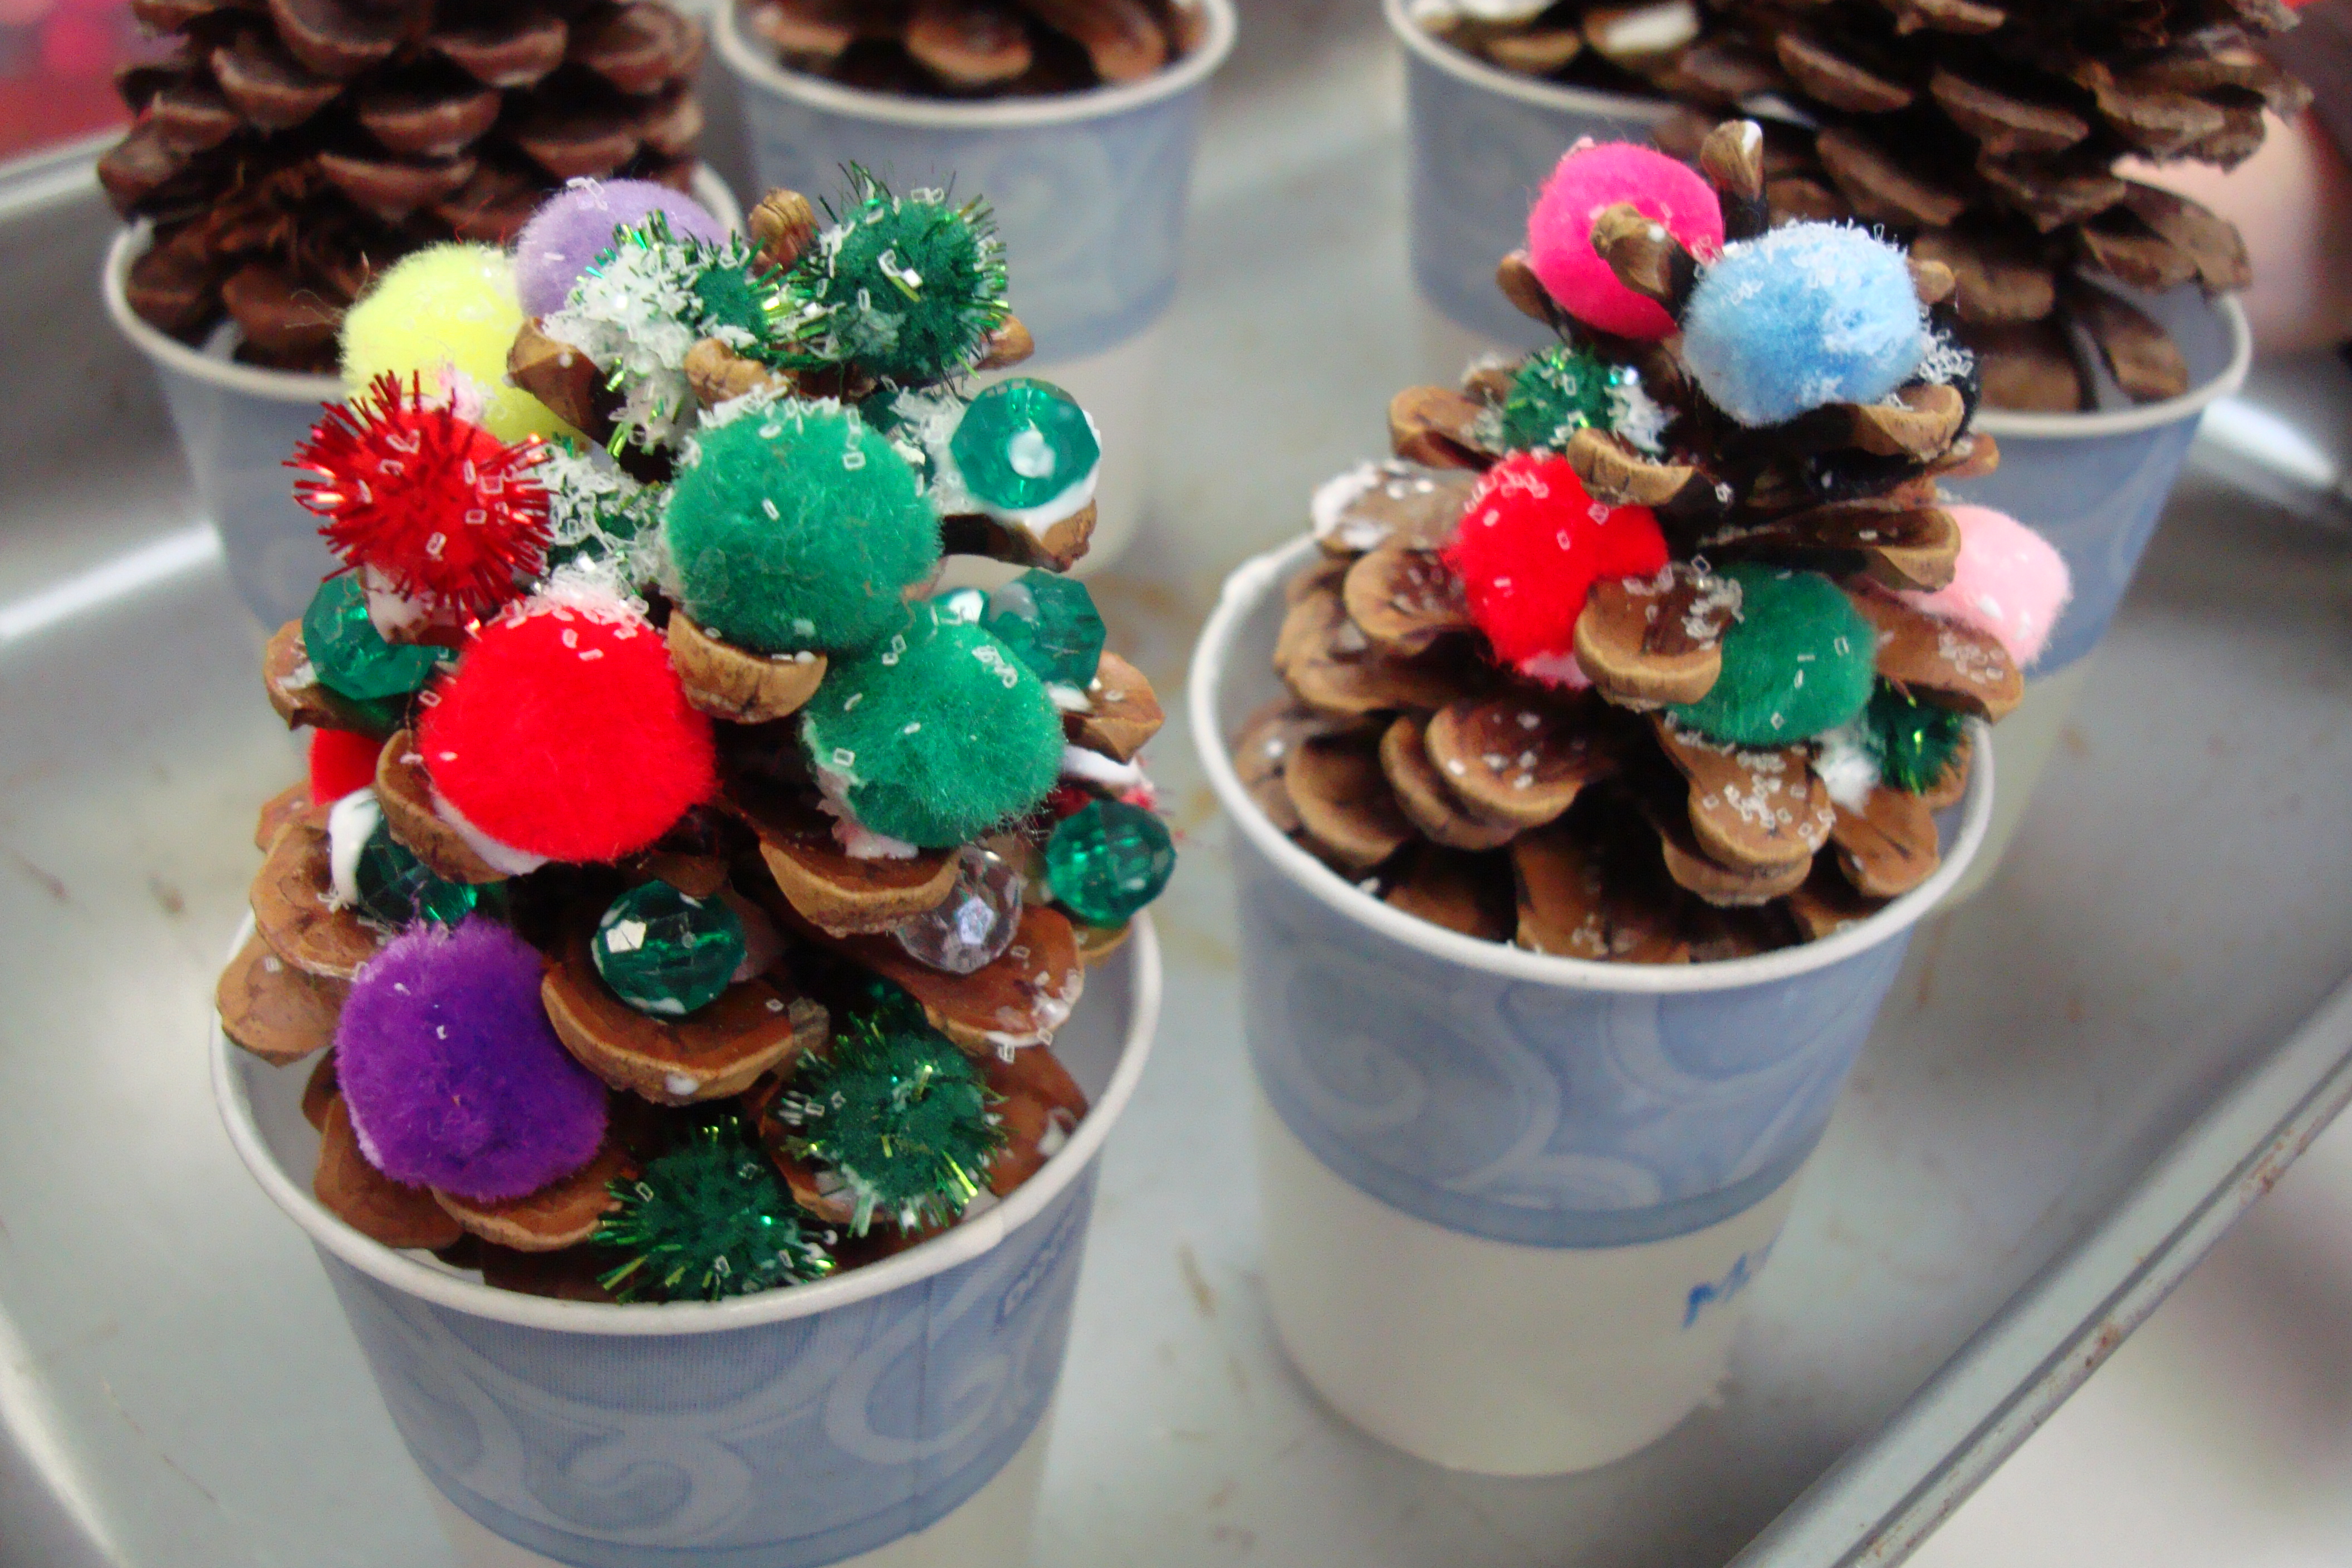
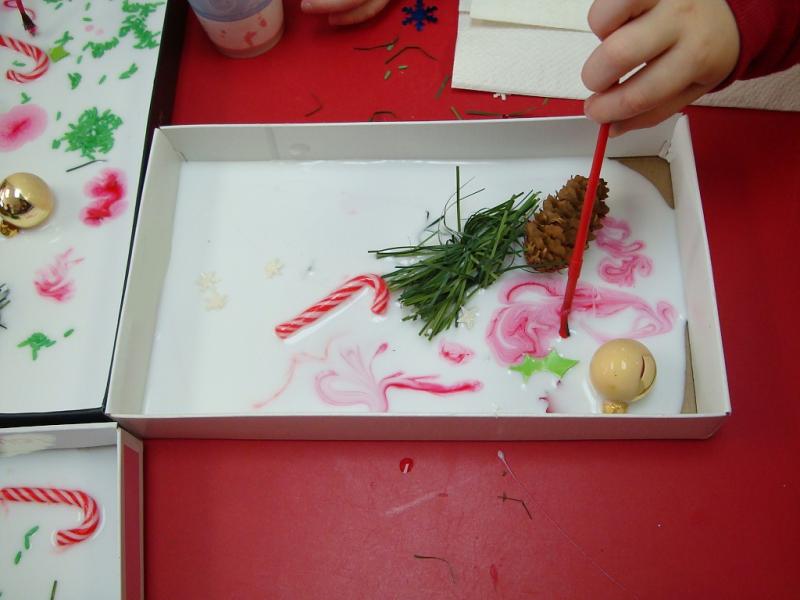
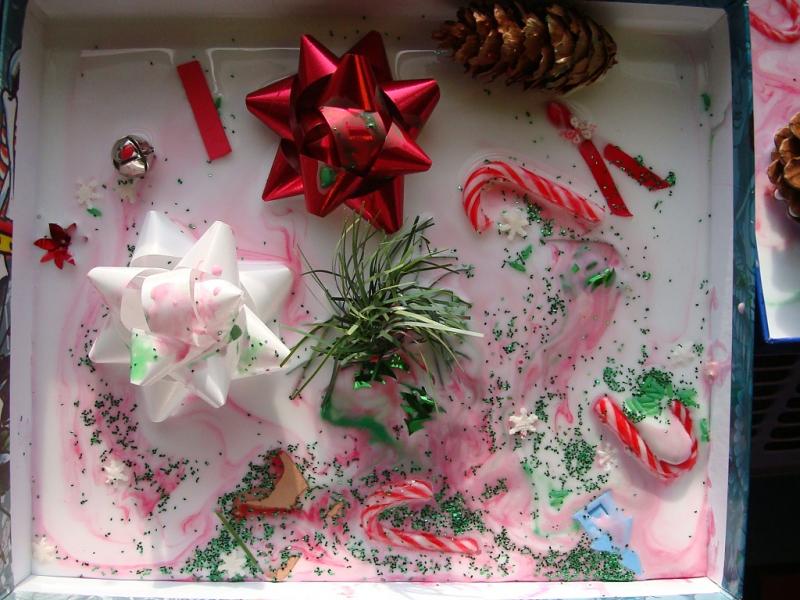
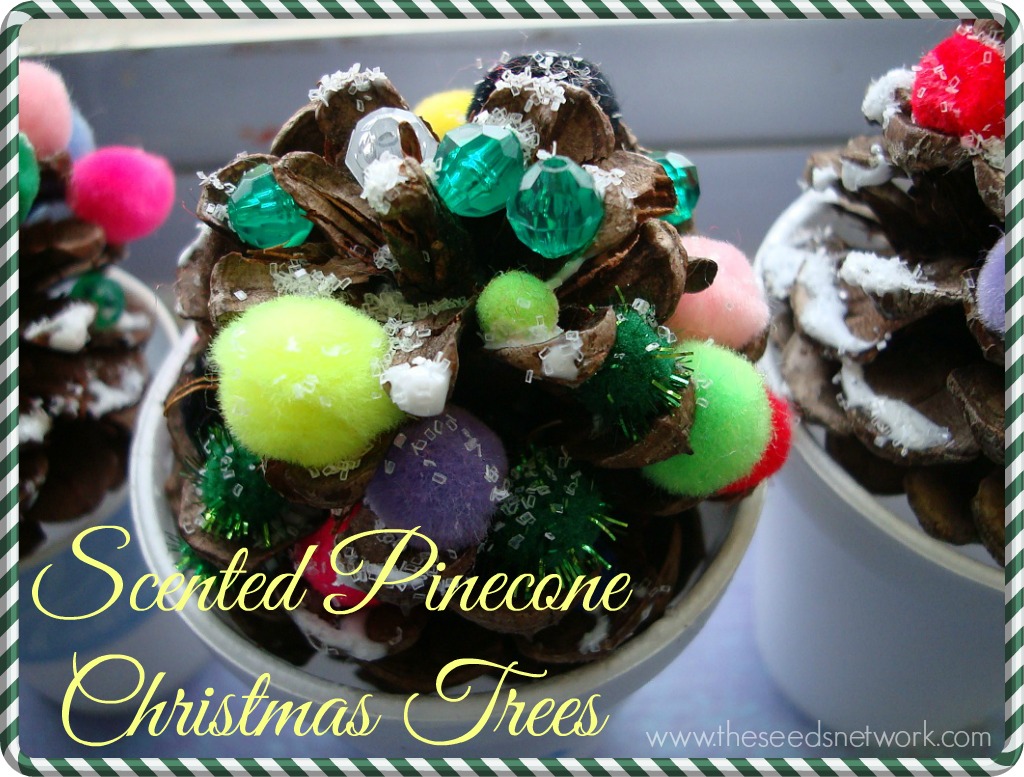
We have been exploring “scents of the season” these past couple of weeks in preschool. As we get ready for Christmas, I saw these cute pinecone trees on The Wool Acorn blog, and I thought this would be wonderful for the children to make. But I wanted to incorporate a holiday scent for the children to explore … so we made sure our pinecones were scented!

I did intend to scent the pinecones myself (I really did!). The pinecones that were collected were a little damp and not yet open – so they were put them in a warm oven. They DID start to open … however the smell coming from the oven was not so pleasant, so we ended that process and ran to store to buy the pre-made scented ones. But I still do want to give this another try at some point (maybe after the pinecones dry out naturally). In any case, the store-bought ones had a lovely cinnamon scent. If you make them yourself, you can experiment with other scented oils.

DSC09252

So, we started off with having the children explore the scent and have them guess what the pinecones smell like. Some of the responses were “delicious” and “cookies” … other responses were “they smell like pinecones”.

DSC09259

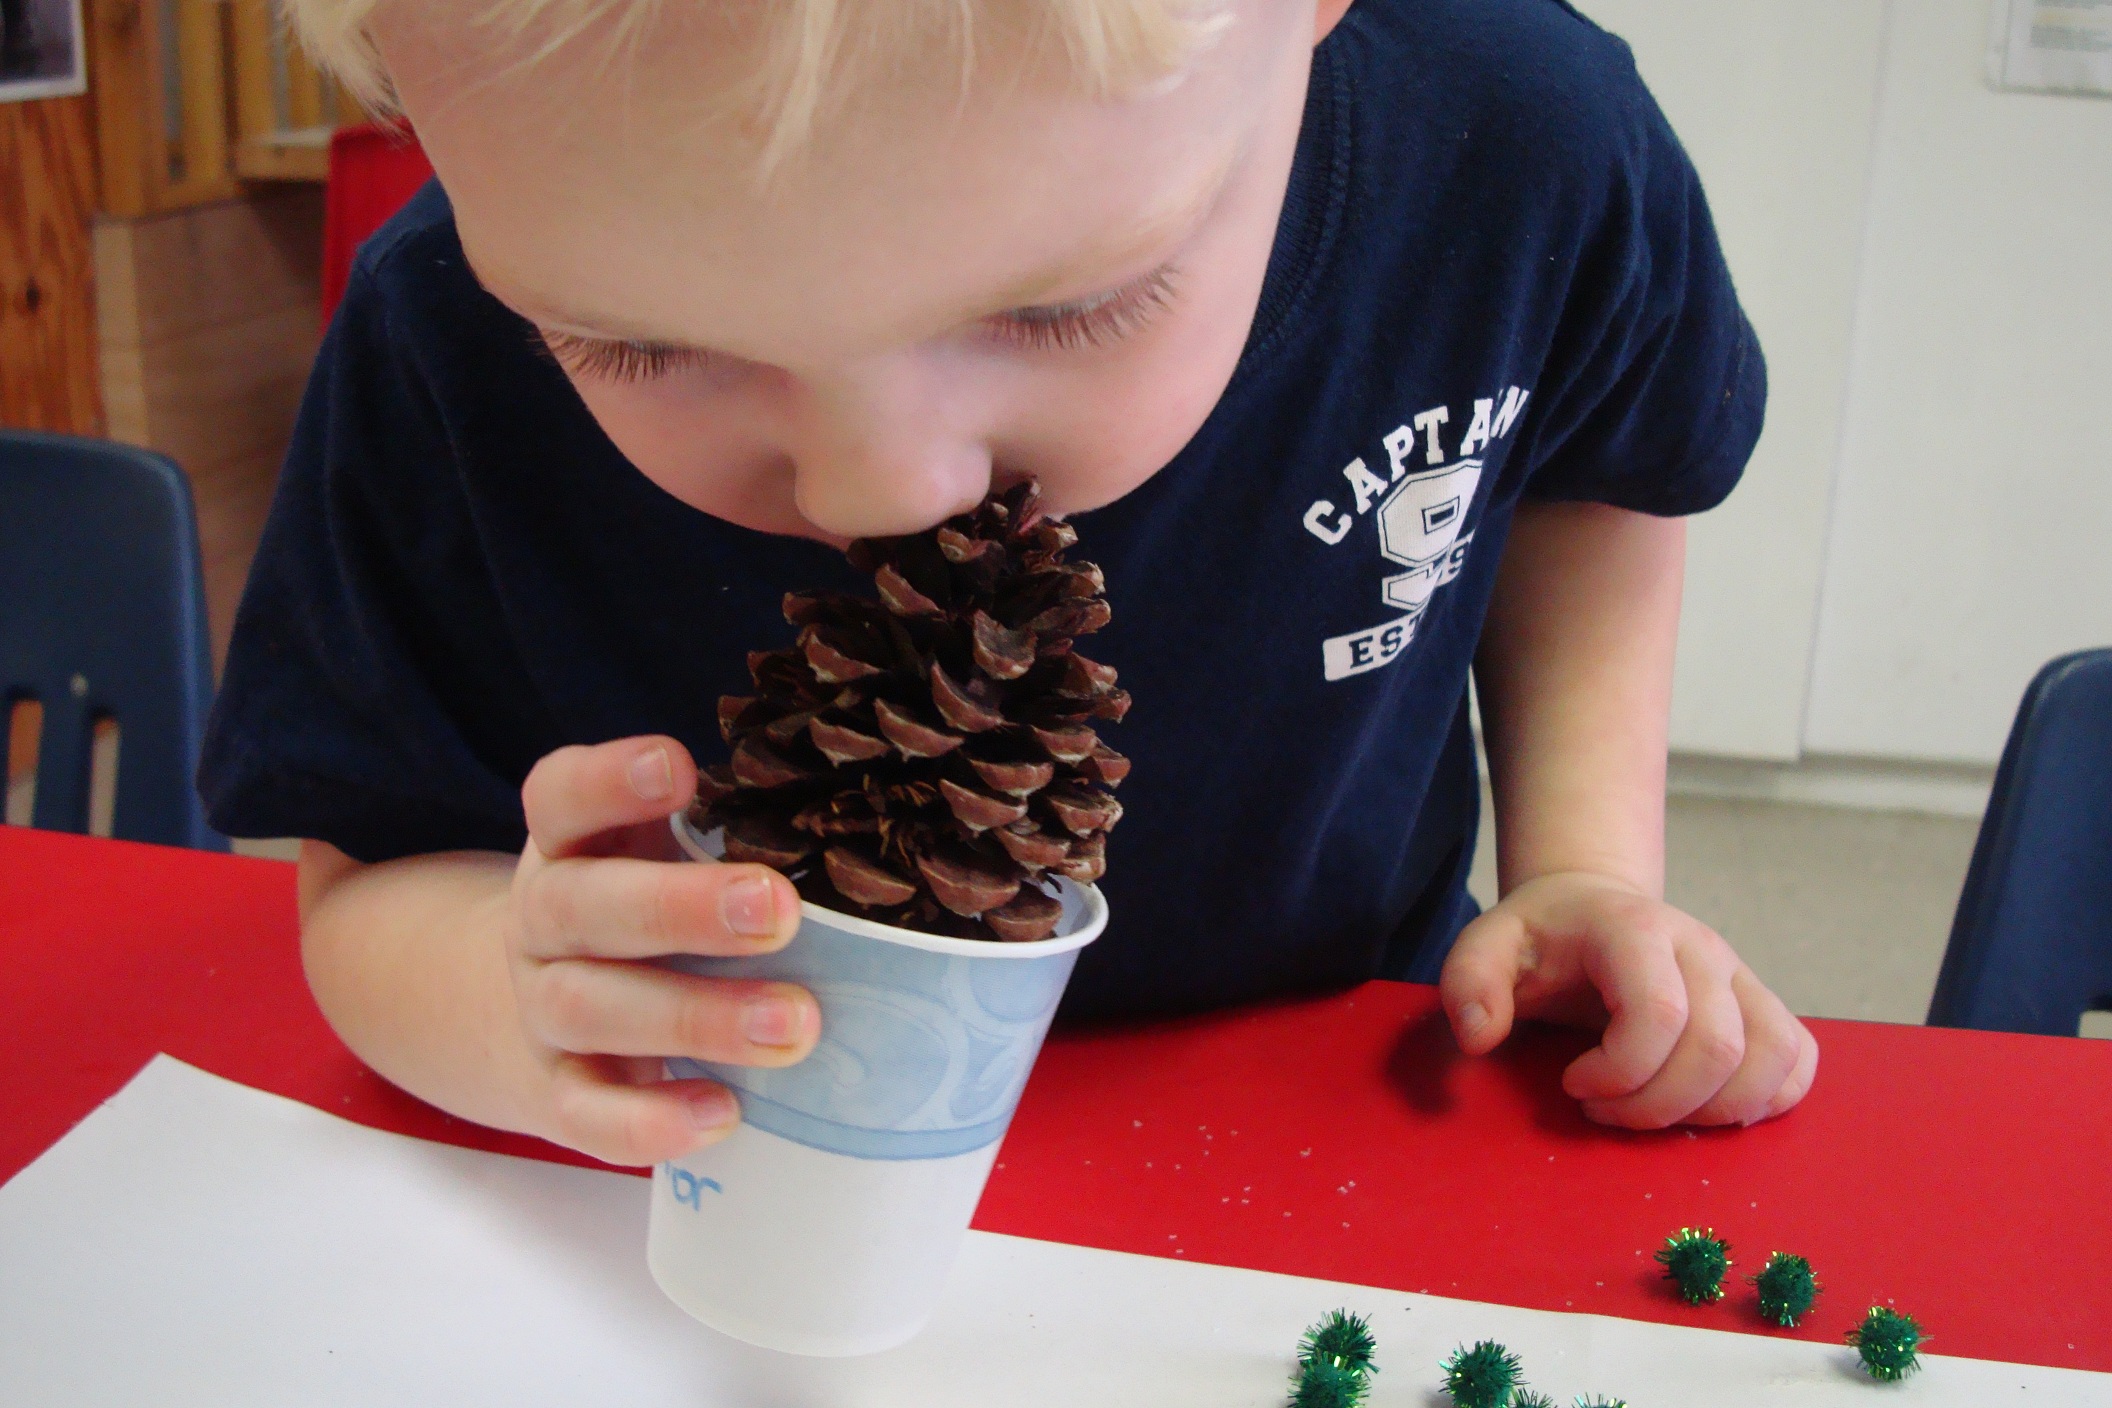
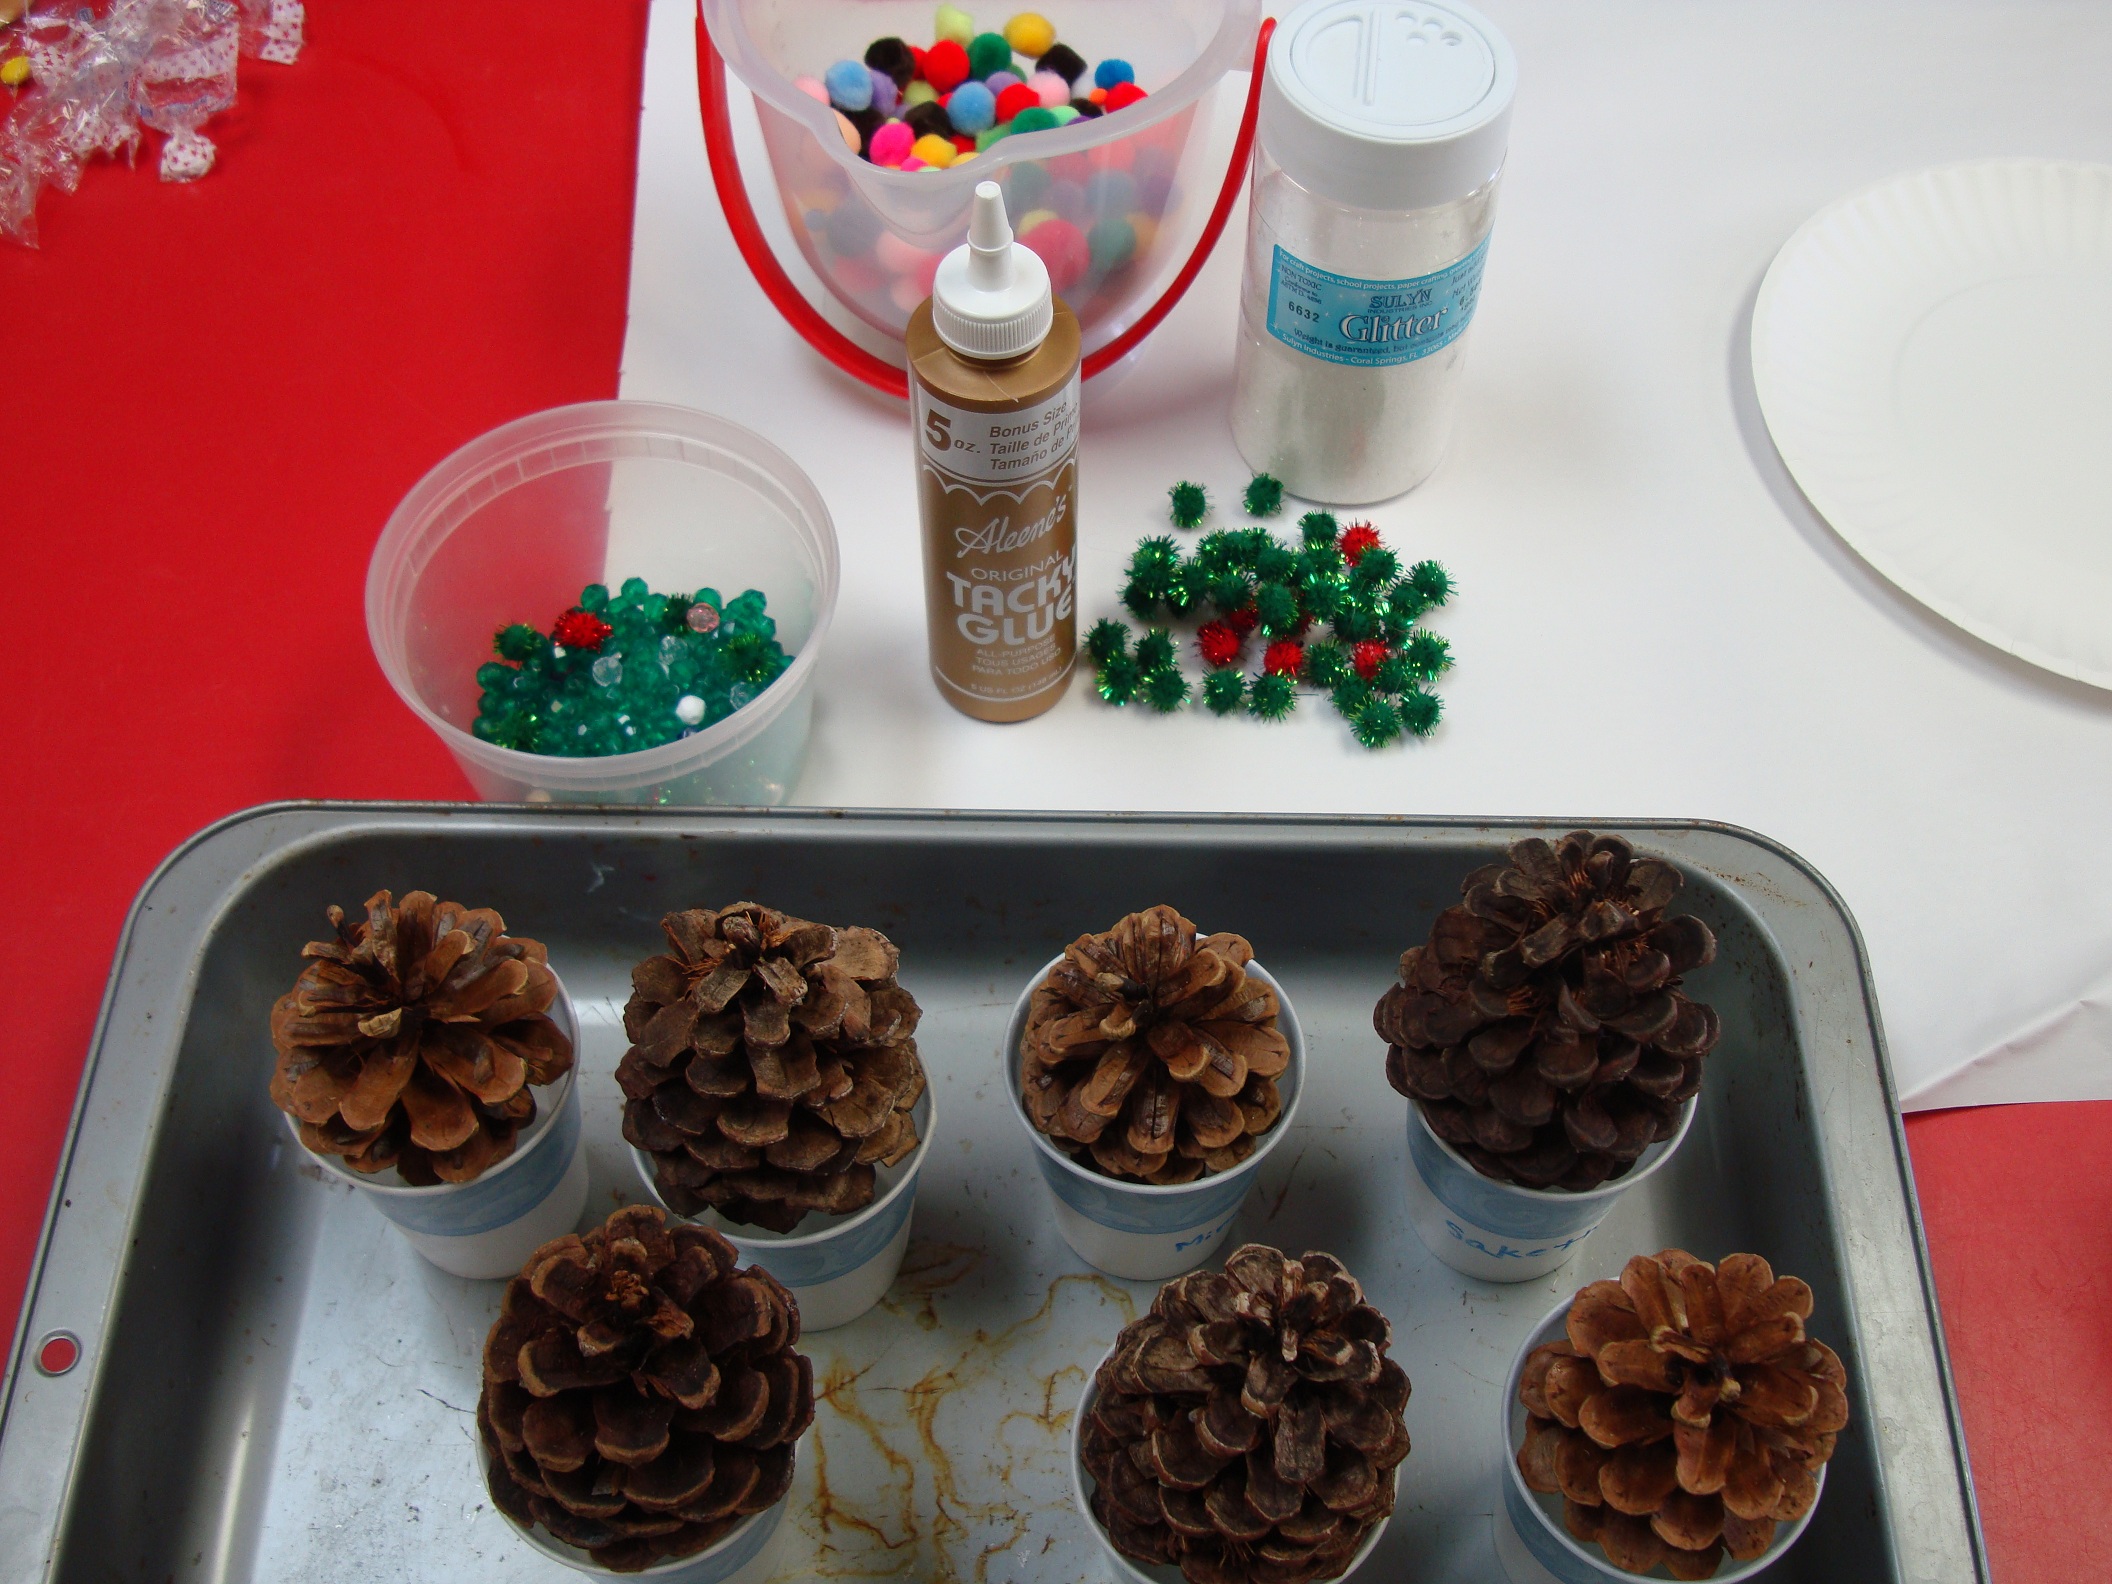
Next, we placed the pinecones in a small paper cup (this helped to keep them upright while children were working on the project). It was also helpful because we could write each child’s name on their cup.

DSC09261

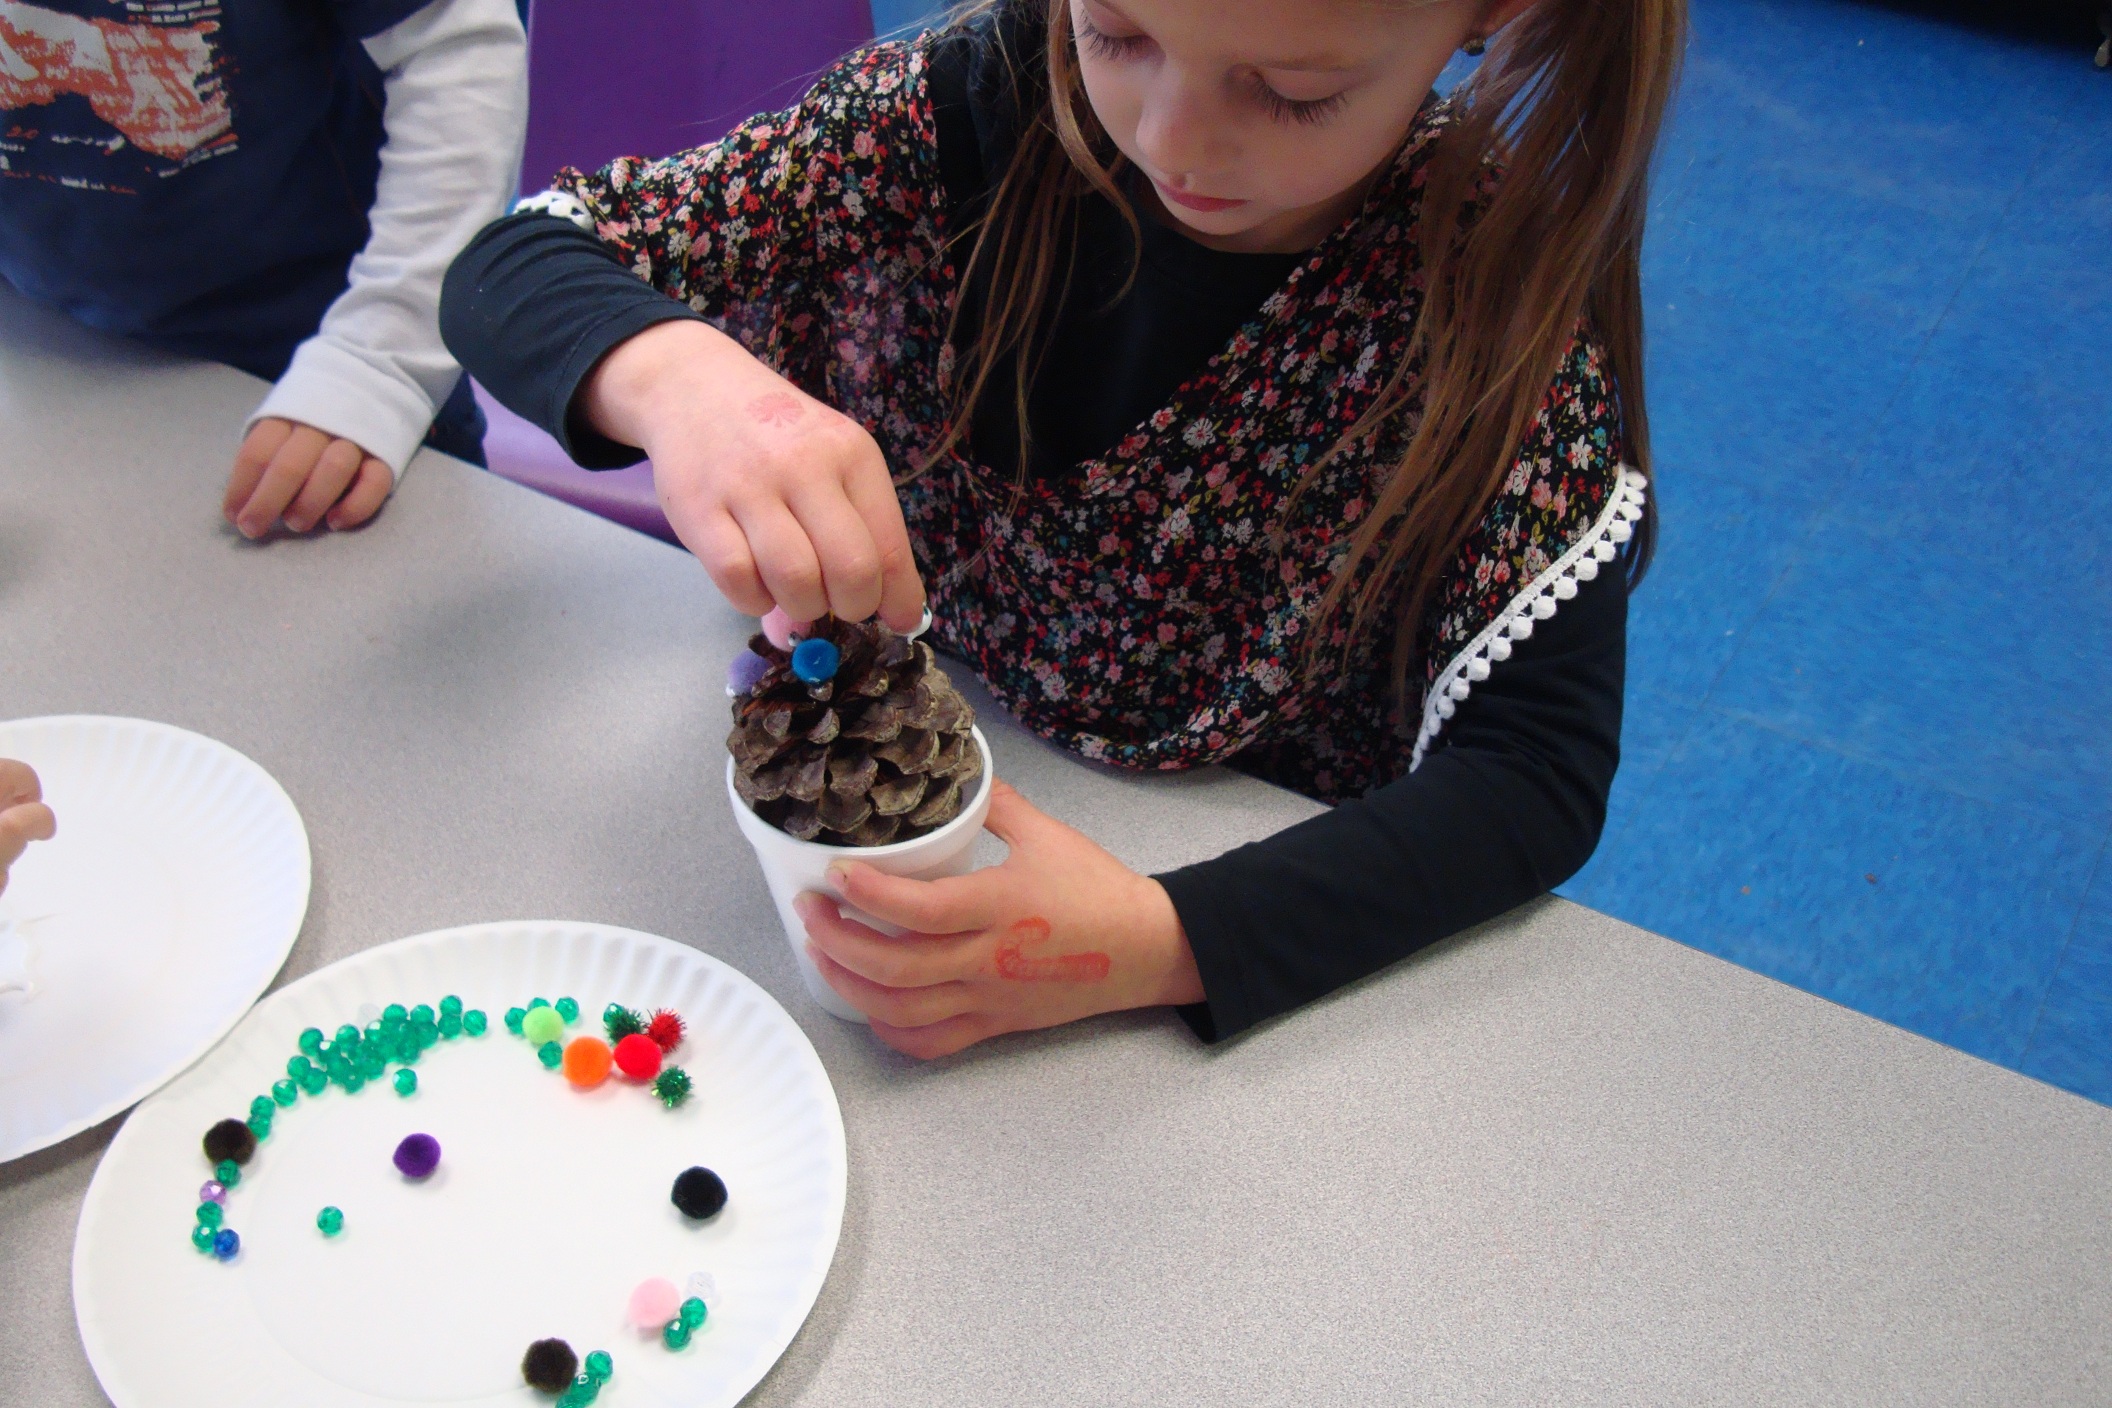
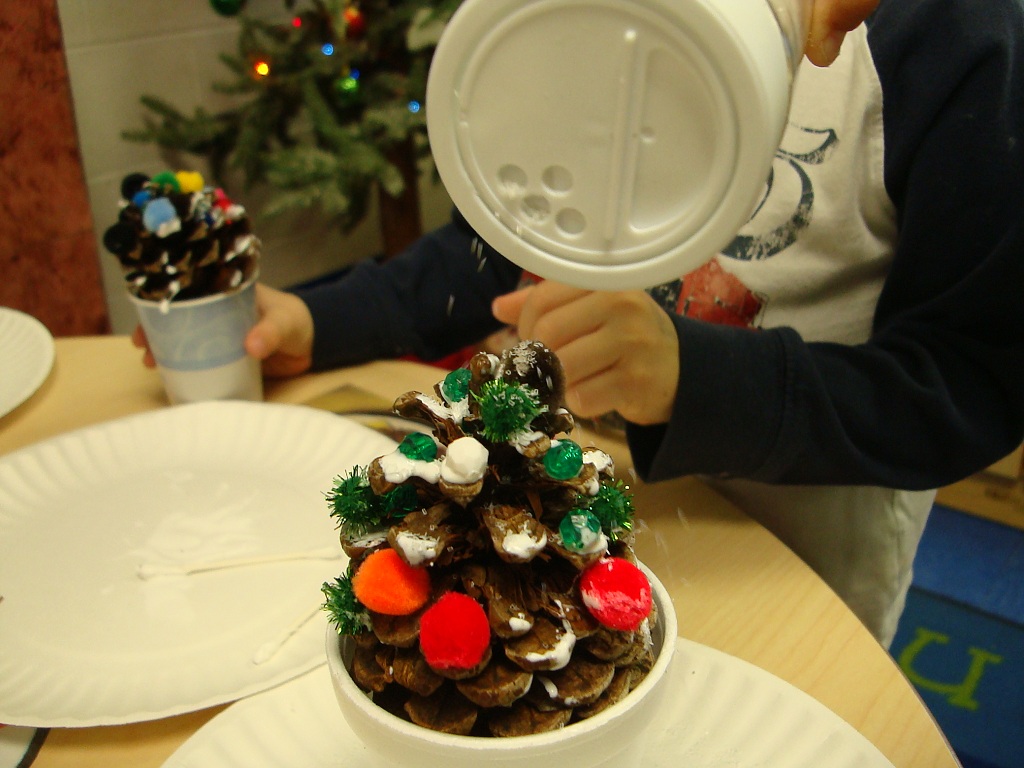
Then we poured a small amount of Tacky glue onto a paper plate. Tacky glue was a great choice for this project because it is thicker than regular white glue (so it’s less drippy). Also, children only need a small dab of Tacky glue and the items will stick very well to the pinecone. We showed the children how to take a pom pom (and other embellishments) and dip them in the glue – explaining that they only need a small dab. (Our 3-year old class still liked to put A LOT of glue on their pom poms!). This was great for fine motor practice. Then we had the children explore the materials and decorate their pinecone Christmas tree as they wished.

DSC09262

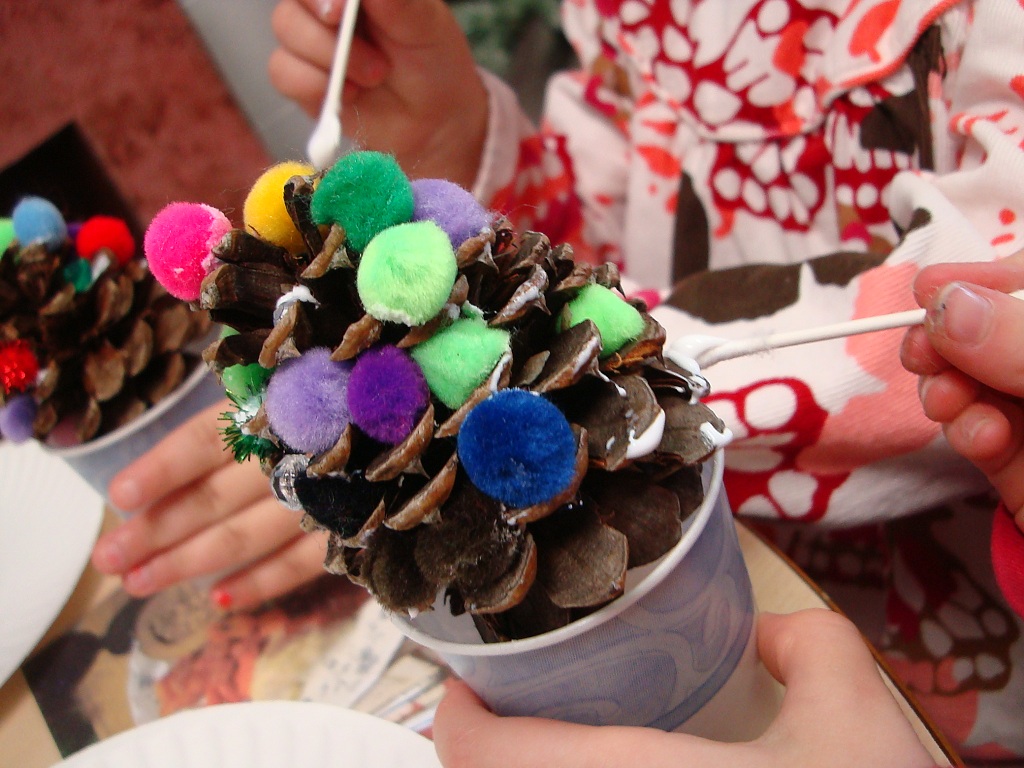
Once they are done decorating, we had them take a Q-tip and dip it in the glue and spread the glue around the edges of the pinecone. Lastly, have children got to sprinkle some white “snow” glitter on top.

DSC09264

The children still liked smelling their pinecone trees after they were finished!

DSC09258

Our “Many Colored Days” ice cube painting

ice cube paintingA good story to read to preschoolers to discuss feelings is “My Many Colored Days” by Dr. Seuss. Each day is described as a particular color, with an animal that corresponds to that feeling.  The use of colors and animals helps to explain feelings in a way that children can start to understand.  For example, on a yellow day there are busy, buzzing bees – and children can pretend to buzz and flap their “wings” quickly to try and understand how it might feel to be a bee (i.e. a yellow day might be a busy day, or a day when you have a lot to do).

After reading the story, the children make a colorful group painting using colored ice cubes – which is simply food coloring and water, or liquid watercolor that is frozen. ** These would need to be prepared the day before – before cubes are fully frozen, stick craft sticks in each cube. **

Take a marker and put happy, sad, mad or excited faces on the ends of the craft sticks. Take out a sheet of large white easel paper and show children the colored “feeling” ice cubes.   Allow the children to experiment with using the cubes to paint onto the white paper.   Discuss some of the feelings from the story as they paint.  Ask them if they can identify the “feeling” that is represented on the cube stick they are painting with.  How does that color make them feel?.

Seasonal shadow boxes

box2 As soon as I saw the nature shadow boxes from Teach Preschool – I just knew we had to do this! The idea of making a shadow box can be adapted to any season (winter, spring, summer, fall or for a certain holiday). Children can collect things from nature, bring in items from home or use collage materials from school. The shadow boxes we made here are Christmas themed.

First, we poured a layer of glue into each shoebox lid — that alone generated many “Oooohs” and “Aaaaahs” from the children! Next, we gave the children an assortment of Christmas themed items (such as small ornaments, candy canes, Christmas confetti, pine branches, etc). Oh yea … I still had some scented pinecones left over from another project, so we used those too! The children chose what items they wanted to put into their boxes.

Next, was the best part! The children were given green and red watered-down tempera paint in cups and they then dipped the paint into the glue. The children loved seeing the color spread as it went into the glue. This kept them busy for quite awhile! Some children chose to paint onto some of the items they put into the shoebox lid.

box1

Lastly, they sprinkled red and green glitter into their shadow box, for a sparkly effect! These take a good 3-4 days to dry fully (depending on how much glue you use). As the glue dries it turns clear (and you may not see much of the paint color) – but the process of painting into the glue was great for the children as they explored how the paint reacted with the glue.

Afterwards, you can use these as I-SPY boxes. (ie. “I-SPY something red”, “I-SPY a candy cane”, etc.).

What other types of shadow boxes could you make? What materials would you use?

Playing with nature on a sticky table

nature on a sticky tableI was very inspired to try making a “sticky table” after seeing the Pumpkin vines on the sticky table activity created by Deborah Stewart on the Teach Preschool site. I thought this would work very well with various items in nature that we have outside during this time of year.

To set this up, I cut a large sheet of clear contact paper and used clear packing tape to adhere the contact paper (sticky side up) to the table so it wouldn’t move around. To have some variety of items, I brought in a collection of leaves, pine branches and small pinecones from home. The children also gathered other leaves and sticks from the playground outside. Depending on the season, you can select other items like flowers, clovers and blossoms.

Then we had the children explore their treasures on the sticky table. They played around and noticed that some things didn’t “stick” so well (like larger sticks). But it’s great for them to explore that. They loved the small pinecones I had found from home — and they had to learn to press down on those to make them stick. Most of the children just liked “sticking” the items to the contact paper. Others tried to fill up all the open space. And some children tried to make shapes of other things out the materials – one girl arranged some small red leaves like flower petals. I heard another say “Look, mine looks like a dragonfly!”. And still others liked walking their fingers across the paper and feeling how they stick!DSC08900.JPG.th

The contact paper allowed for children to explore the items and be able to move them around (it’s sticky – but items are repositionable). After they were done playing, we folded over the contact paper and sealed it. This makes for a good display to be hung in the classroom or put into the science center, where children can touch it and feel the impression of the items underneath.

I think in the Spring I’ll bring the contact paper OUTSIDE and attach it to a picnic table and make a nature collage there!

What other kinds of things can you do with a sticky table?

Making sticky collages in preschool

sticky collagesIt’s no secret that I LOVE doing activities with “sticky paper” (AKA: clear contact paper). I usually do “sticky projects” as a small or large group activity. For this project, I decided to have children make an individual piece of artwork, and let them explore and create with the materials as they wished.

To do this, each child had to have their own sticky board. To make the sticky board, I took rectangular cardboard pieces and attached contact paper to them with the sticky side facing UP. To do this … before peeling and exposing the sticky surface of the paper – you cut the contact paper into rectangular pieces, slightly larger than each piece of cardboard. Then, place the contact paper on top of the cardboard, and adhere it to the board with masking tape. Do not peel the shiny side of the contact paper off until you are ready for children to use it.

sticky collages

When you are ready for children to start creating, peel the contact paper and expose the sticky surface.

Some collage items we used were: cut pieces of felt, paint chip samples, tissue paper, twist ties, feathers and foam shapes

The options are virtually endless with this – you can really use almost any type of light-weight collage material.

We gave each child a small piece of cardstock to write their name on. They put this onto their sticky board. Then, we provided a variety of collage materials, and let the children create as they wished!

It was interesting to see how the different children used the materials .. some focused on color, some focused on the type of collage items, and some constructed scenes or objects.

sticky collages

We also used colored duct tape to make a frame on the edges of the boards – and this also reinforced the contact paper onto the cardboard.

Want more Sticky Paper ideas?

Lots of other ideas available on creative ways to use sticky contact paper in preschool! Check out: Making sticky collages

sticky collages4

Making bead mazes in preschool

bead mazesThree simple materials = a great opportunity for children to explore their creativity, problem solving and fine motor skills!

Right after the holidays, I had a lot of large pieces of styrofoam that was used to pack some of our Christmas gifts. Like, nice, solid blocks of styrofoam. Now, like any good preschool teacher, you don’t just THROW that kind of stuff away!

So we decided to use these sturdy styrofoam blocks as the base to make some bead mazes, using pipe cleaners and large beads. I put the materials out and described to the children that they can create their own bead mazes (similar to the kind you can buy at a store). I demonstrated how to stick one end of the pipe cleaner into the styrofoam block and then string beads. Then, I sat back and watched the building begin!

bead mazes

I had 2 classes do this activity … our 3 year old class and a 4 year old class. With the 3 year olds, they each had their own block of stryofoam to work with. This is a great fine motor workout for the younger preschoolers – as some needed assistance with pushing the pipe cleaner into the styrofoam. In some cases, it was helpful to make the hole for them first, and then allow them to put the pipe cleaner into the hole. This was a good independent activity for them, letting them work at their own pace to push in the pipe cleaners and string the beads. Some made elaborate mazes, some just strung a few beads and were finished.

And some children loaded up their pipe cleaners with as many beads as possible. In doing so, they learned that they were not be able to “slide” their beads, and in some cases, this was too heavy for the pipe cleaner. This was an opportunity to problem solve how to fix their maze. The styrofoam allows for the children to build their maze, but easily move the pipe cleaners if they want to change something.

bead mazes

With the 4 year old class, I had them work in pairs. For the older preschoolers, the challenge came not in stringing the beads, but in figuring out how to work together to build their maze. They looped their pipe cleaners over and under, and made some really cool mazes!

This is a great activity to leave setup in a tactile table or bin … allowing children to create, play, take apart and create again!

Mad DOT challenge!

Mad DOT challengeThis challenge just seemed “irresistible” to me!! My friends Donna and Sherry over at Irresistible Ideas For Play Based Learning posted about the MAD DOT CHALLENGE they were doing along with their friend, Marc Armitage.

The challenge … to take something that is completely white, give young children a bunch of DOT stickers … and let them stick to their hearts content! They loved the opportunity to just stick the stickers anywhere they wanted. The creative activity was also great for fine motor development … and a wonderful group project the whole class can feel proud of!

The challenge for me … what could I find that was ALL white – and that was ok for the children to decorate with stickers? Luckily, we were finishing up our “exploring countries” theme and I thought about the columns one of our teachers created for our Italy classroom. PERFECT!

When I told them what we were going to do with the columns, the reaction was … “ooooohh!”

Many children tried to put their dots up as high as they could reach. Others worked to make patterns or grouped them by color.

This activity is also fun paired with the book “Press Here” (see a review of this book with another DOT activity over at Teach Preschool).

Mad DOT challenge2

Mystery play dough in preschool

play doughWe’ve enjoyed making and experimenting homemade made play dough all year long … and by far the most favorite was the “mystery play dough” we made last week! In the “great minds think alike” category … Deborah Stewart at Teach Preschool did the same activity recently (stop by and see what her class did with their play dough).

I made up a batch of homemade play dough beforehand, (but you can have children can assist with this process, measuring and mixing the ingredients). I did mine beforehand because I wanted this to be a mystery. Next, I formed balls of play dough and used a straw to make a small hole into the play dough and then added a few drops of food coloring into it and covered it up. (Deborah used liquid watercolor, which I think I’ll try next time).

play dough2

When I got to class, I showed the kids the play dough balls and asked them what they thought I had in my hands (“play dough”) and what color it was (“white”). I asked them if they were SURE that the play dough was white (and they were). I then told them that there was something mysterious about this play dough, and when they played with it – “something would happen”!

So, each child got a ball of play dough and they were excited when it changed color!

Lots of screams of “I’ve got red!” and “Mine’s turning green!

The kids LOVED it – and it was great for their fine motor development as they had to kneed and squeeze and really work the play dough to get the color all through.

The color spreads very well throughout the homemade play dough.

We had one child with a gluten allergy, and since I didn’t have all the ingredients to make a batch of gluten-free play dough, I also make up some balls of regular store-bought white play dough and added drops of food coloring in those as well. While the homemade stuff is softer and the color spread more evenly; the regular white play dough mixed with the food color created a pretty marble effect.

play dough3

At the end, one little girl said “Miss Laura, that was the BEST activity ever!” That says it all … doesn’t it?!

Check out more fun play dough ideas on our SEEDS Idea Search and on our Pinterest board.

What is your favorite play dough activity?

Open-ended winter art in preschool

Open-ended winter artToday we brought in some seasonal items from nature along with some play dough … and just let the children have at it! We used winter nature items from our area, such as pinecones and pine branches. Since I still had some extra scented pinecones – we used those. Some of the pine branches also had a good pine scent – so this was definitely a sensory experience for the hands, eyes AND nose!

Each child had a ball of play dough, a pinecone and a couple of small pieces from a pine branch to start off. We have various types of pine trees in our area, so we used a variety. I didn’t tell the children what to do with them. Most realized very quickly that they can make the pinecone and pine branches stand upright by using the play dough as a base. Other children noticed how they can make imprints of the pinecone in the play dough. And still others tried covering their pinecone entirely with the play dough.IMG2318.jpg.th

Then, I added a few other sensory items … some cotton balls and seasonal colored macaroni and white glitter beads. Of course, I was thinking that they could make a snowy scene with the materials. But, instead they made their own creations – some used the cotton balls to look like snow – others realized that the cotton would “stick” to the play dough. Some used the colored macaroni to decorate the pinecone. Others simply smashed the macaroni into the play dough.IMG2333.jpg.th

One child realized the pine needles looked like quills and made a porcupine! It really didn’t matter what they did – they very much enjoyed the process and creating their own masterpiece!