After Christmas tree bird feeders

Here is an activity to go with the story “The After Christmas Tree” by Linda Wagner Tyler.   The story is about happens to the family Christmas tree after Christmas is over.  What do you do with it?  Family members and friends take their Christmas tree into the backyard and decorate it with edible trimmings for the wild birds and animals.

This is something that families can do together or teachers can do with their classes.  There are many ways to make birdfeeders (with pinecones or out of milk cartons).  This birdfeeder is made out of biscuits.

Biscuit Bird Feeders

First, make biscuits according to package instructions (or buy them pre-made).  Then, post a straw through the middle (this is where you will feed the yarn or string through for hanging).

Next, have children spread peanut butter or shortening onto the biscuit and then have them roll it around in the birdseed.

Put your Christmas tree outside and hang them on it for the birds and animals.  You can also hang them on any trees that you have outside!

Making scented pinecone Christmas trees

 pineconetree

We have been exploring “scents of the season” these past couple of weeks in preschool. As we get ready for Christmas, I saw these cute pinecone trees on The Wool Acorn blog, and I thought this would be wonderful for the children to make. But I wanted to incorporate a holiday scent for the children to explore … so we made sure our pinecones were scented!

I did intend to scent the pinecones myself (I really did!). The pinecones that were collected were a little damp and not yet open – so they were put them in a warm oven. They DID start to open … however the smell coming from the oven was not so pleasant, so we ended that process and ran to store to buy the pre-made scented ones. But I still do want to give this another try at some point (maybe after the pinecones dry out naturally). In any case, the store-bought ones had a lovely cinnamon scent. If you make them yourself, you can experiment with other scented oils.

DSC09252

So, we started off with having the children explore the scent and have them guess what the pinecones smell like. Some of the responses were “delicious” and “cookies” … other responses were “they smell like pinecones”.

DSC09259

Next, we placed the pinecones in a small paper cup (this helped to keep them upright while children were working on the project). It was also helpful because we could write each child’s name on their cup.

DSC09261

Then we poured a small amount of Tacky glue onto a paper plate. Tacky glue was a great choice for this project because it is thicker than regular white glue (so it’s less drippy). Also, children only need a small dab of Tacky glue and the items will stick very well to the pinecone. We showed the children how to take a pom pom (and other embellishments) and dip them in the glue – explaining that they only need a small dab. (Our 3-year old class still liked to put A LOT of glue on their pom poms!). This was great for fine motor practice. Then we had the children explore the materials and decorate their pinecone Christmas tree as they wished.

DSC09262

Once they are done decorating, we had them take a Q-tip and dip it in the glue and spread the glue around the edges of the pinecone. Lastly, have children got to sprinkle some white “snow” glitter on top.

DSC09264

The children still liked smelling their pinecone trees after they were finished!

DSC09258

Stackable Christmas trees

treesI love, love, LOVE the story “Mr. Willowby’s Christmas Tree”! It’s a great seasonal story about how one BIG Christmas tree became a gift for many people and animals. The rhymthic flow of the story is fun to read, and when I read it to my kids or in class, they love how the top of the tree gets a “snip”!

Mr. Willowby’s Christmas tree Came by special delivery.
Full and fresh and glistening green—
The biggest tree he’d ever seen.

The Story

In the story “Mr. Willowby’s Christmas Tree“, Mr. Willowby’s tree was so tall, it couldn’t stand up straight in his parlor. Mr. Willowby asked his butler to chop off the top of the tree. And through the rest of the story, we follow the treetop as it gets shared. I searched for a fun activity that preschoolers could do to go with this story. I wanted something special that went with the story – and found this stackable tree idea from Bella Dia.

The  Activity

This activity provides children a tangible way to see how you can take ONE part of a tree and break it down into smaller trees. It demonstrates how shapes can be used to build upon each other to make something bigger or smaller – and how shapes can be used to create other shapes. Beforehand, I constructed one stackable tree to use as I read the story. Each time Mr. Willowby’s treetop gets a chop … I took a piece off tree, so the children can see how the one big tree can be broken down into smaller parts. It really got their attention to see me take a piece of my paper tree off each time Mr. Willowby’s treetop got a snip!

Afterwards, the children got to make their own stackable tree. First, I cut 4-6 half circles of various sizes out of green construction paper. Each child got 1 set of the half circles to decorate as they wished with stickers and markers (you should use only flat embellishments, so that the tree will stack properly).

IMG2357.JPG.th

Once the children have decorated their tree, I showed them how the 2-dimensional half circle can be curled/folded to create a 3-dimensional cone shape and taped it to secure. After doing this for each of the half circles – the children had fun stacking and unstacking their own Christmas tree! And it was a great way for them to remember the story!

I’m sharing this post with two great blog hops:

Read.Explore.Learn at JDaniels4’s Mom – visit to see great book choices and activities to go with them!

AND

Visit Debbie Clement’s Happy Birthday Blog Hop (Rainbows Within Reach)! Stop by and wish Debbie a “Happy Birthday” and visit all the fun ideas that are linked up below!!

IMG2374_JPG_main

Oh the many ways to make Christmas trees in preschool

Christmas tree


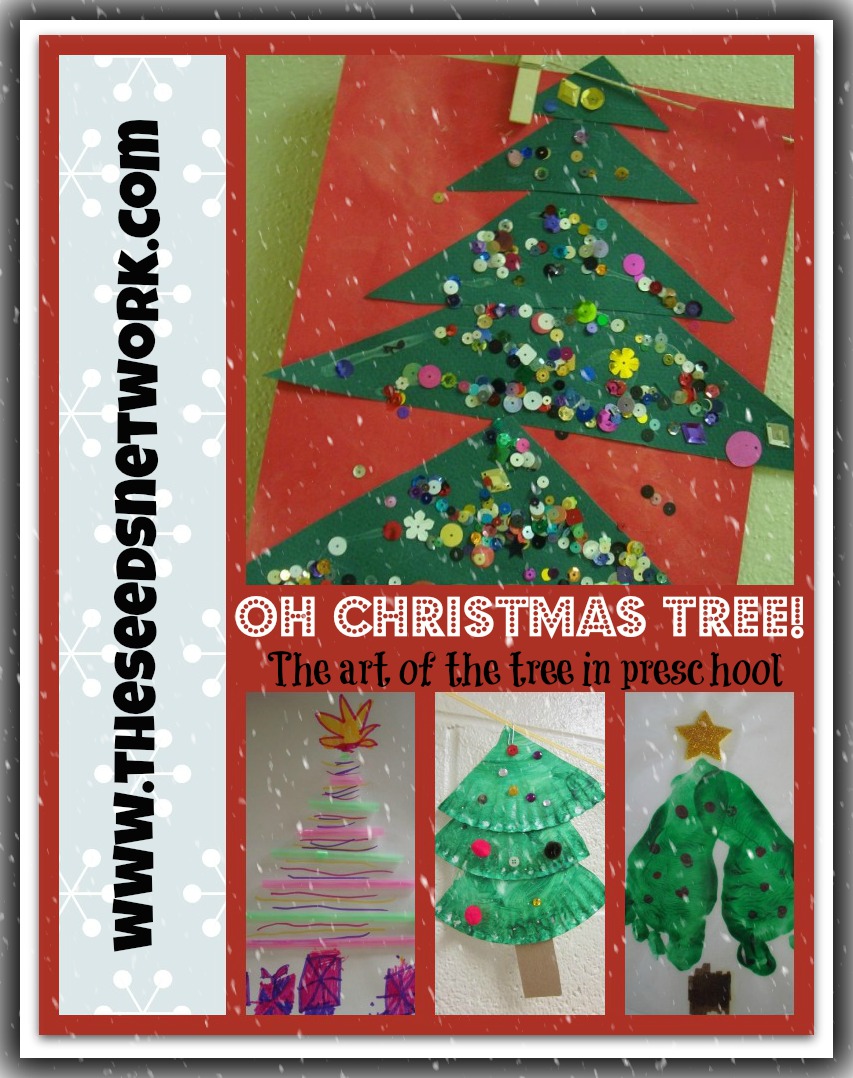
Oh Christmas tree – so MANY WAYS to make a Christmas tree in preschool! From tissue paper to egg cartons, sticks to straws – there are so many different materials that can be used to make Christmas Tree Art projects. And lots of learning that can take place in the process – creative expression, counting, sequencing, fine motor development … so here’s a round-up of some really creative trees that can be made with infants to kindergarteners!


Easy TriangleTrees

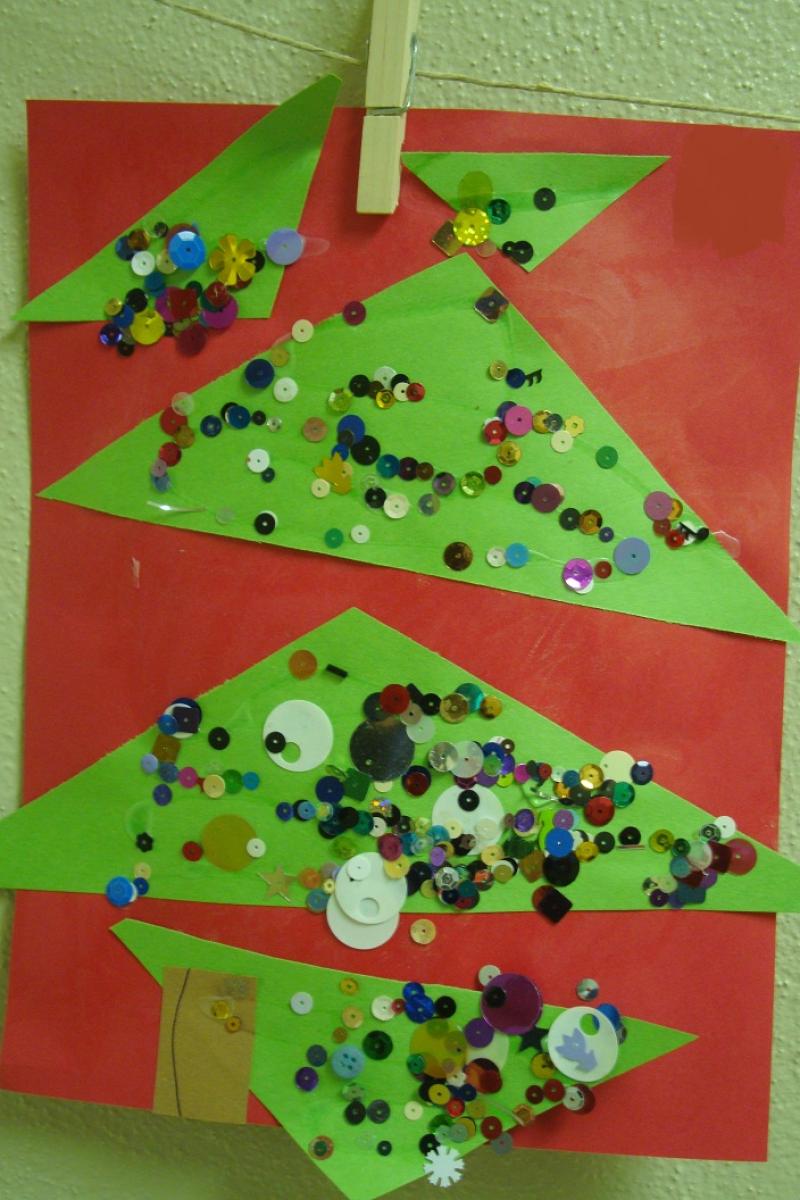
Perfect activity for toddlers and young preschoolers to express their creativity! Give them some pre-cut triangle shapes in various sizes and have them put together a tree on a piece of paper, and then embellish with sequins. The “not so perfect” tree shapes are priceless!

Infant Mistletoes

This is such an adorable Christmas keepsake!
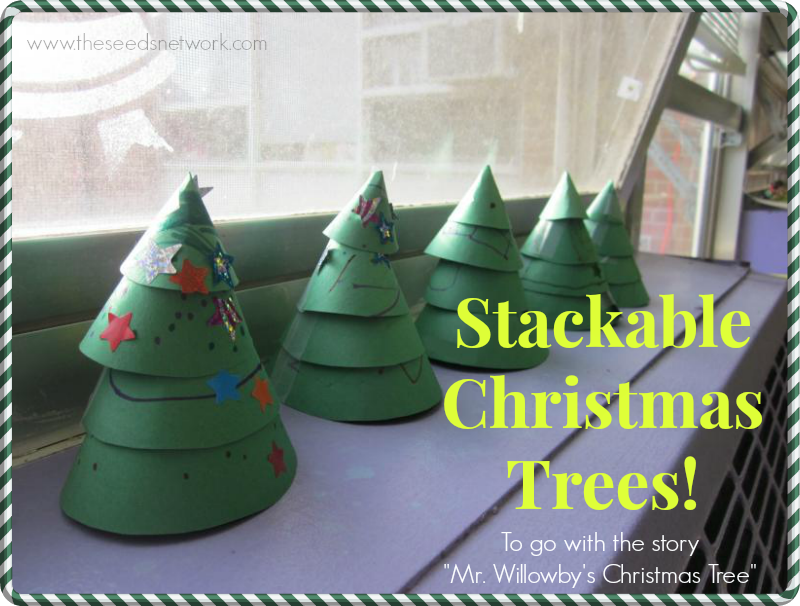
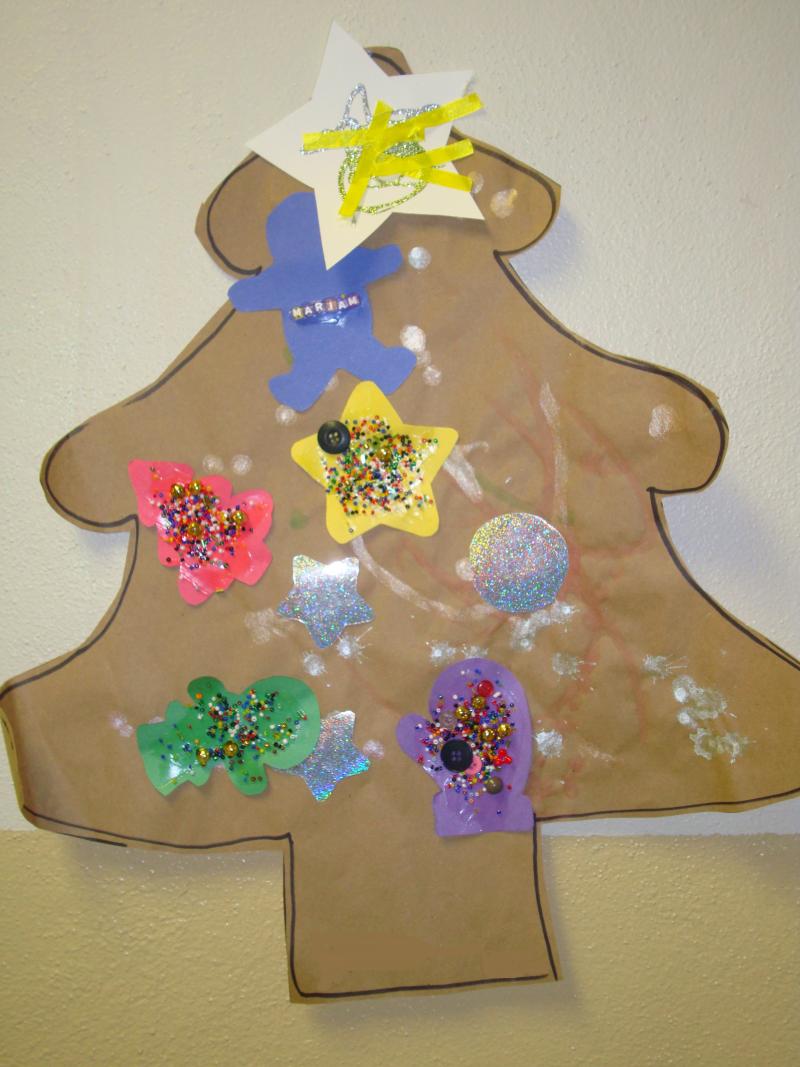
Stackable trees

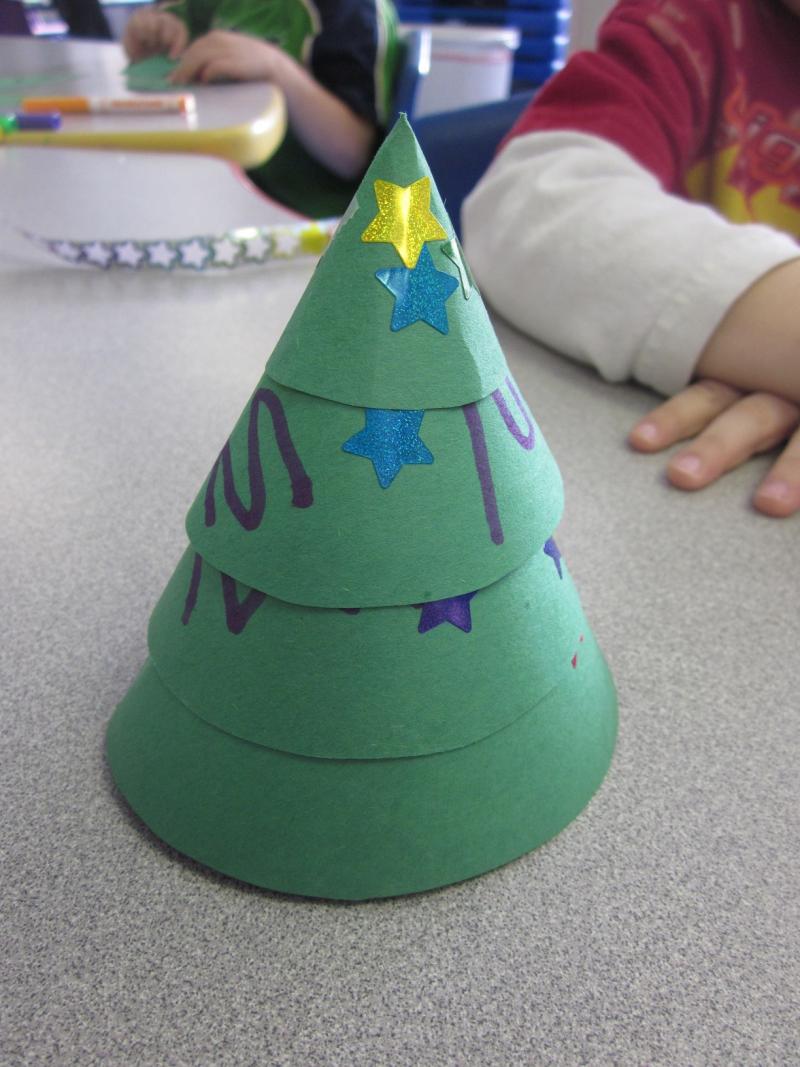
I have the children make these trees after reading “Mr. Willowby’s Christmas Tree”. They get four different size semi-circles to decorate. After decorating, we turn the half circles in cone shapes and then stack the (good sequencing activity to go from largest to smallest cones to stack).

Egg Carton trees

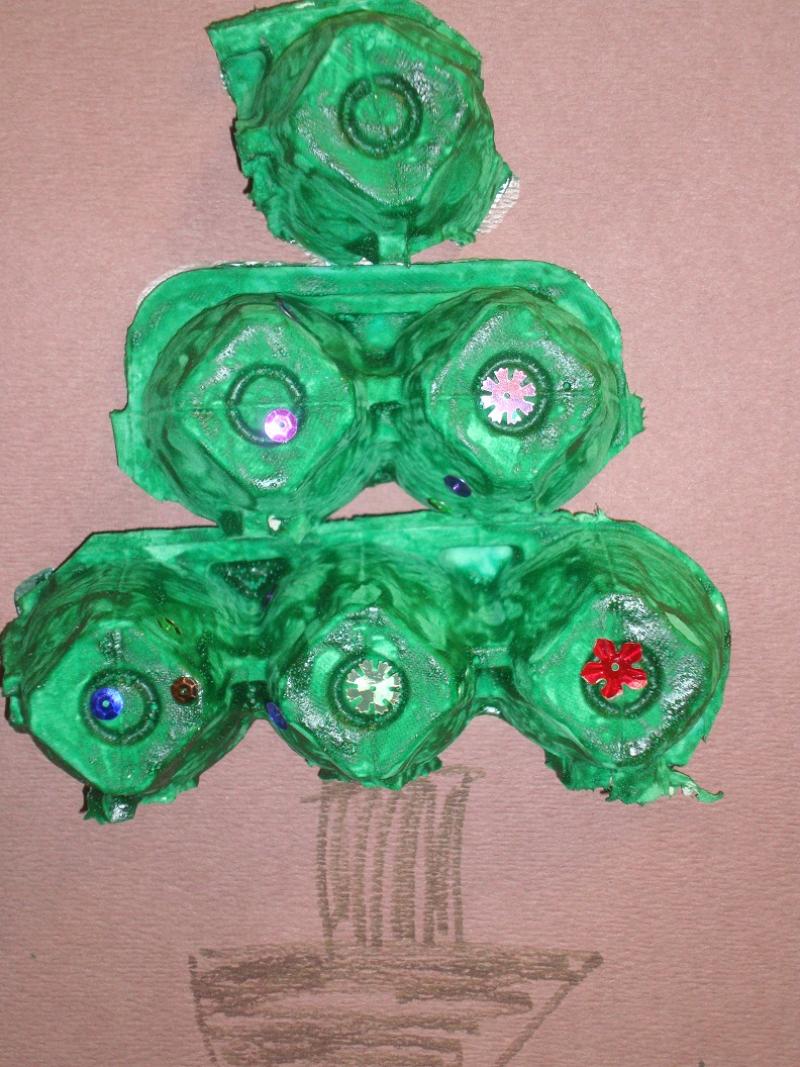
Older preschoolers and kindergarteners can use recycled egg cartons which they cut, paint and arrange to form a tree.

Christmas Tree of Straws

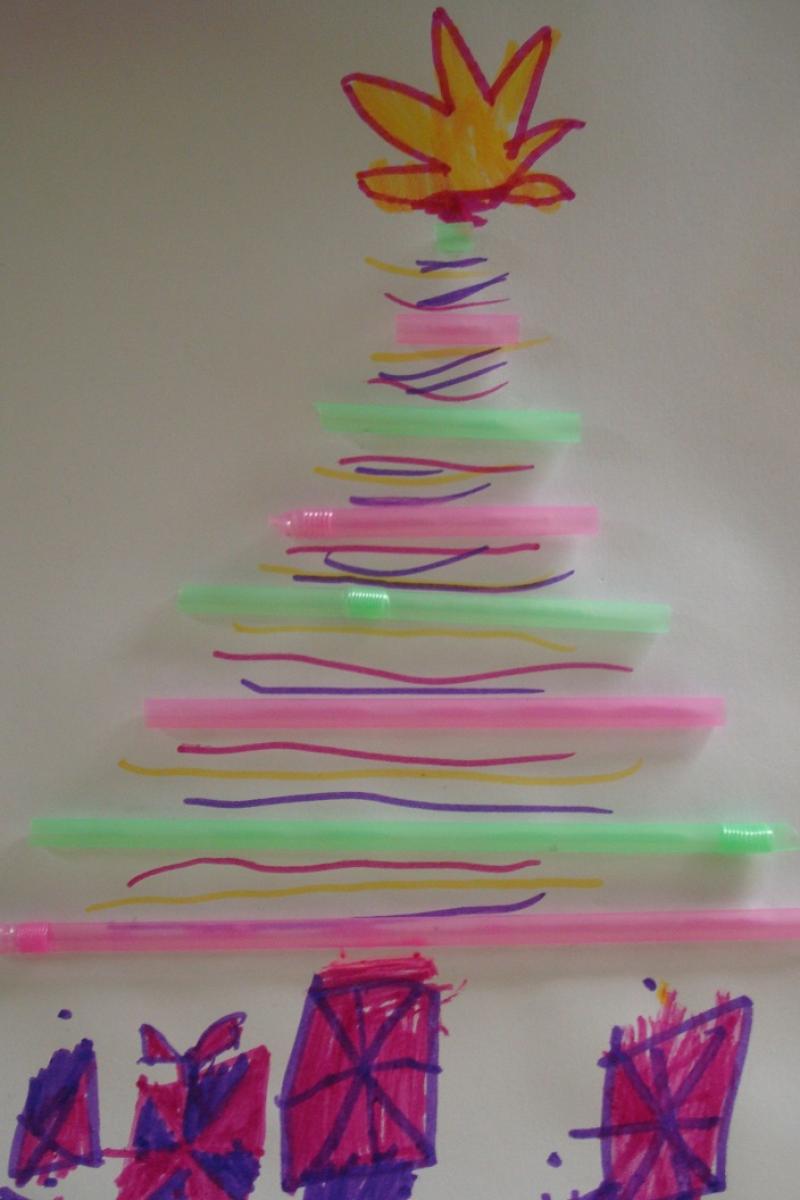
Children will get some great fine motor practice cutting the straws into all different sizes. They can then work to arrange the straws from longest on the bottom to shortest on the top to form their tree.
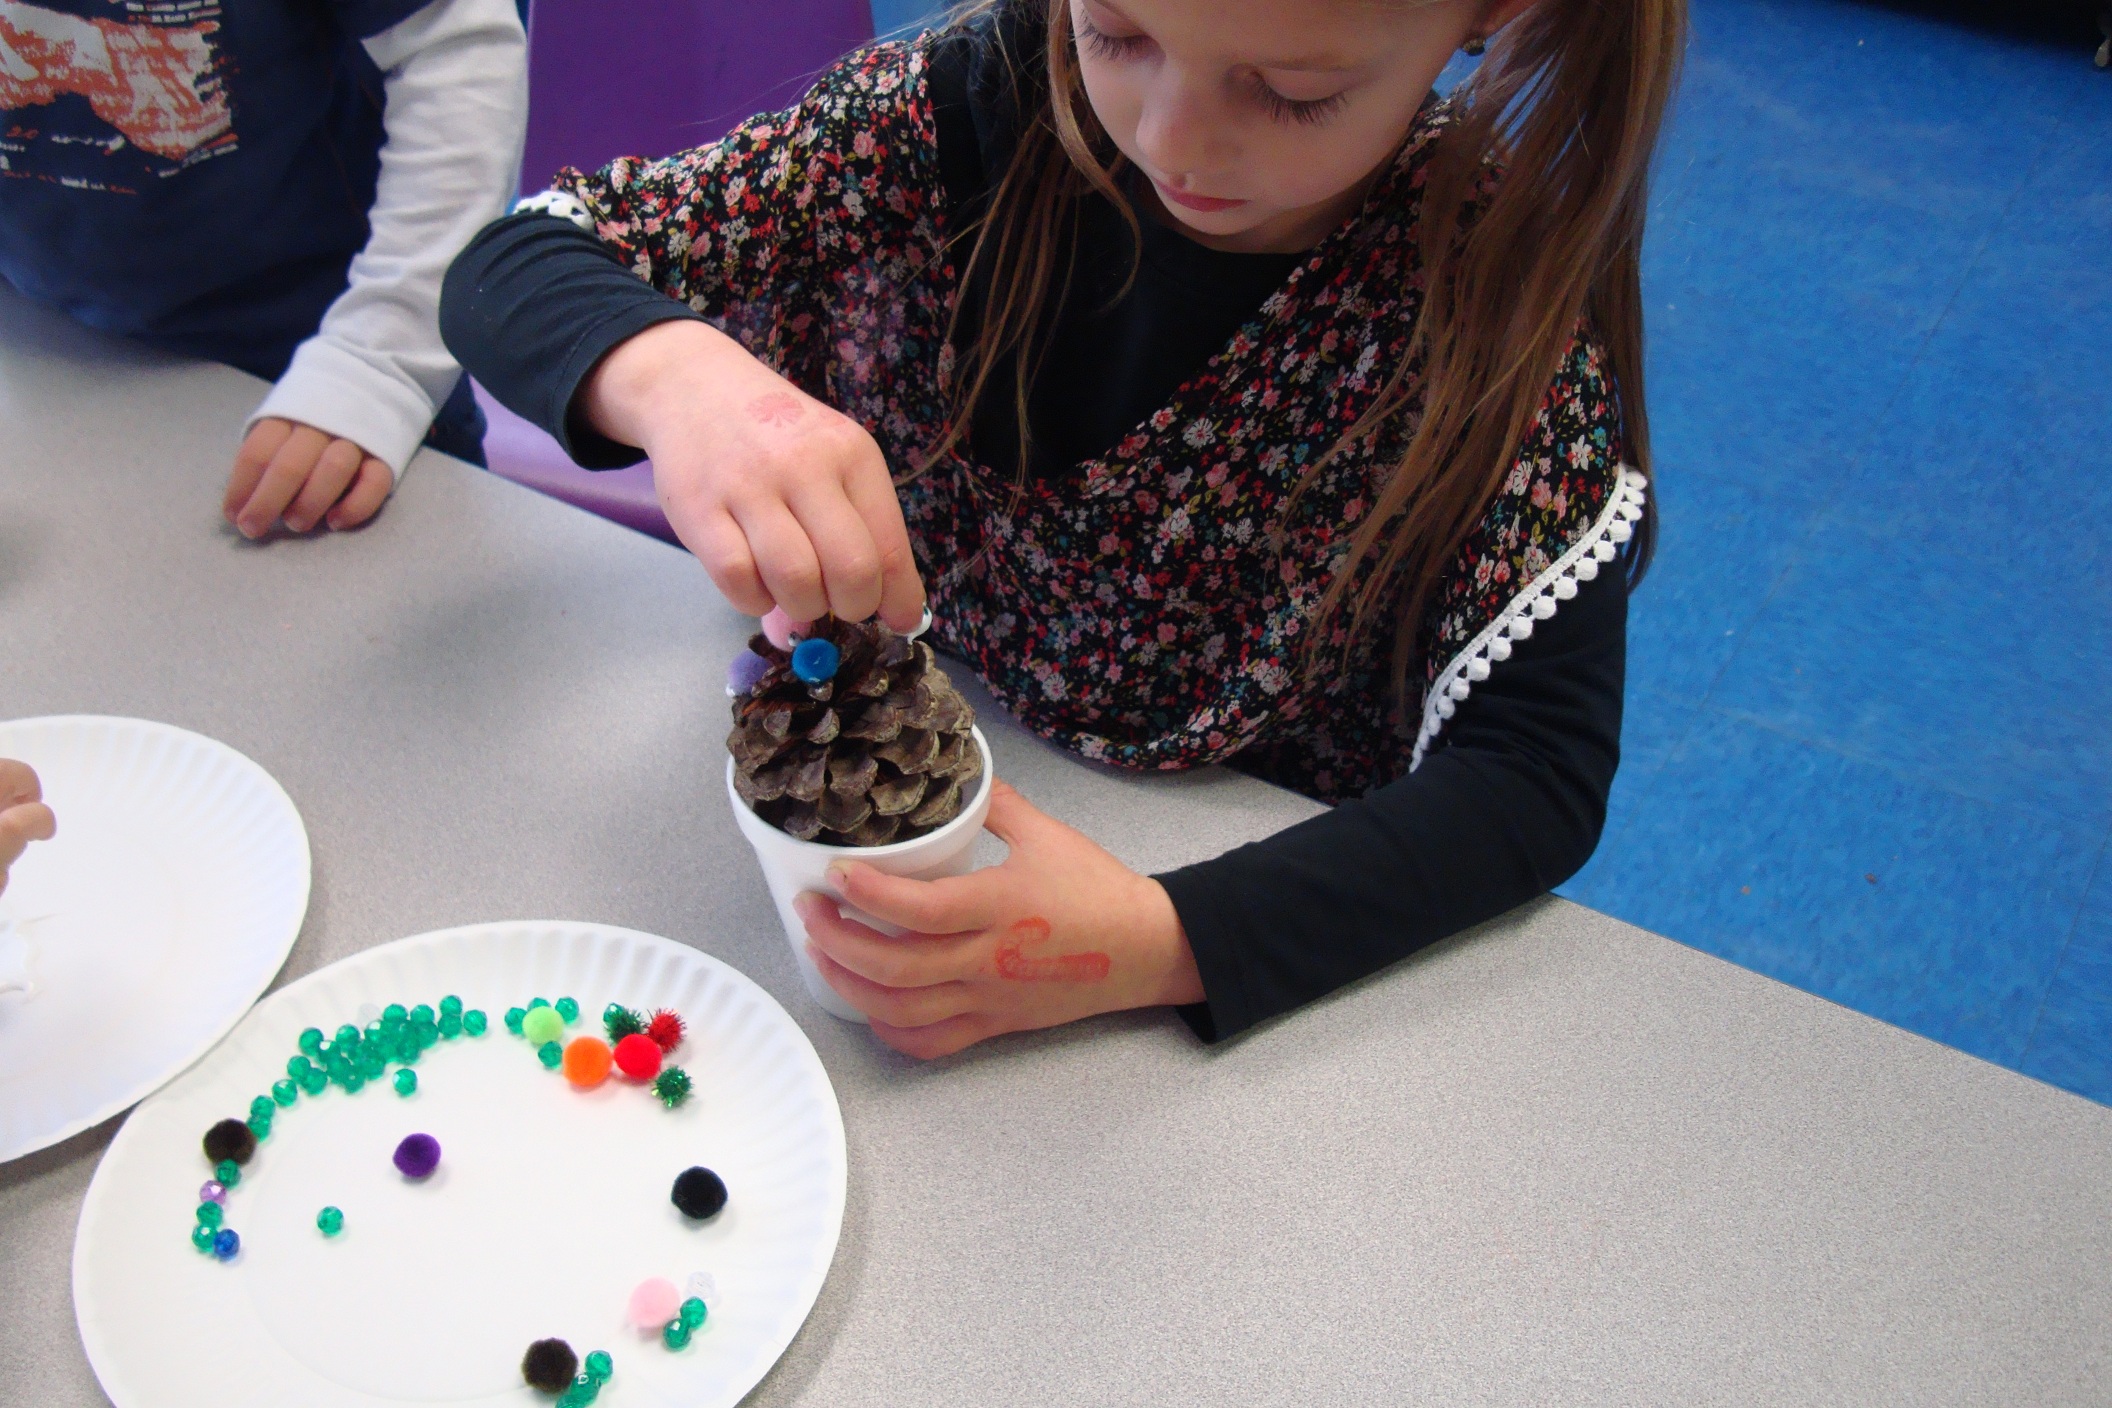
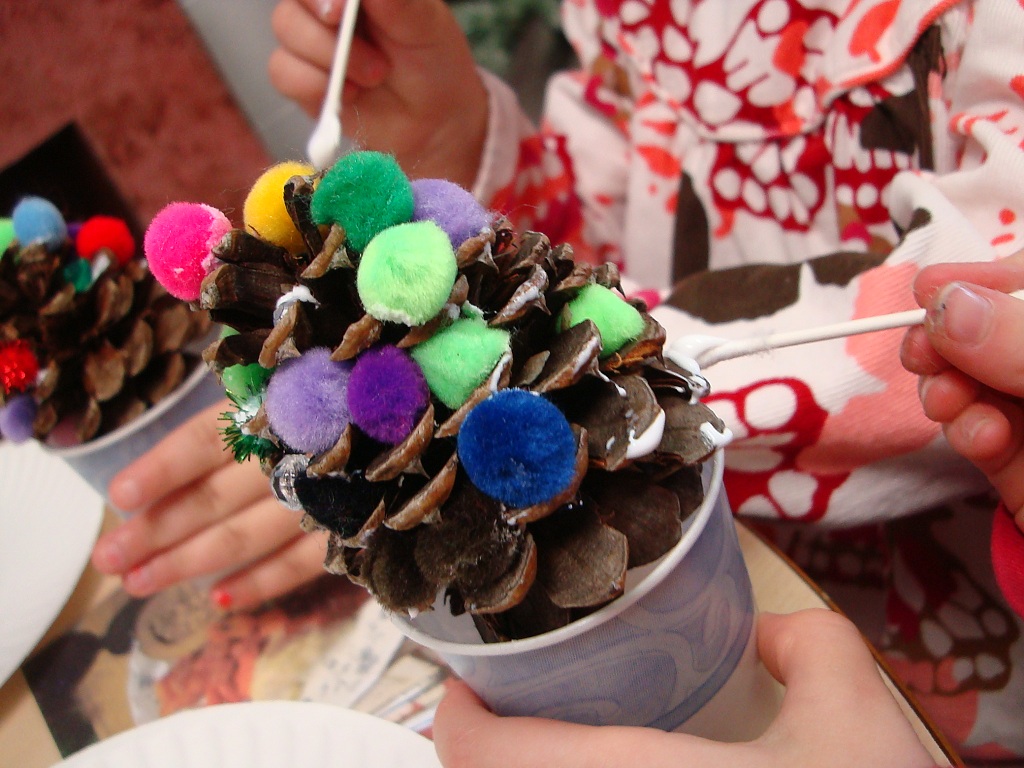
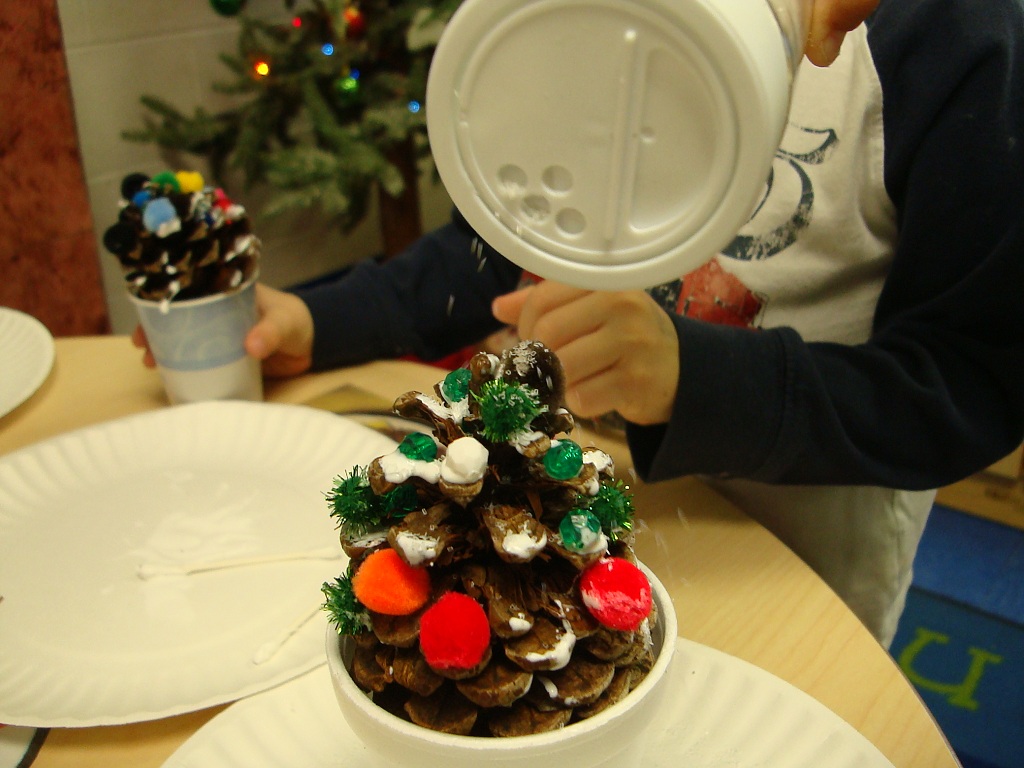
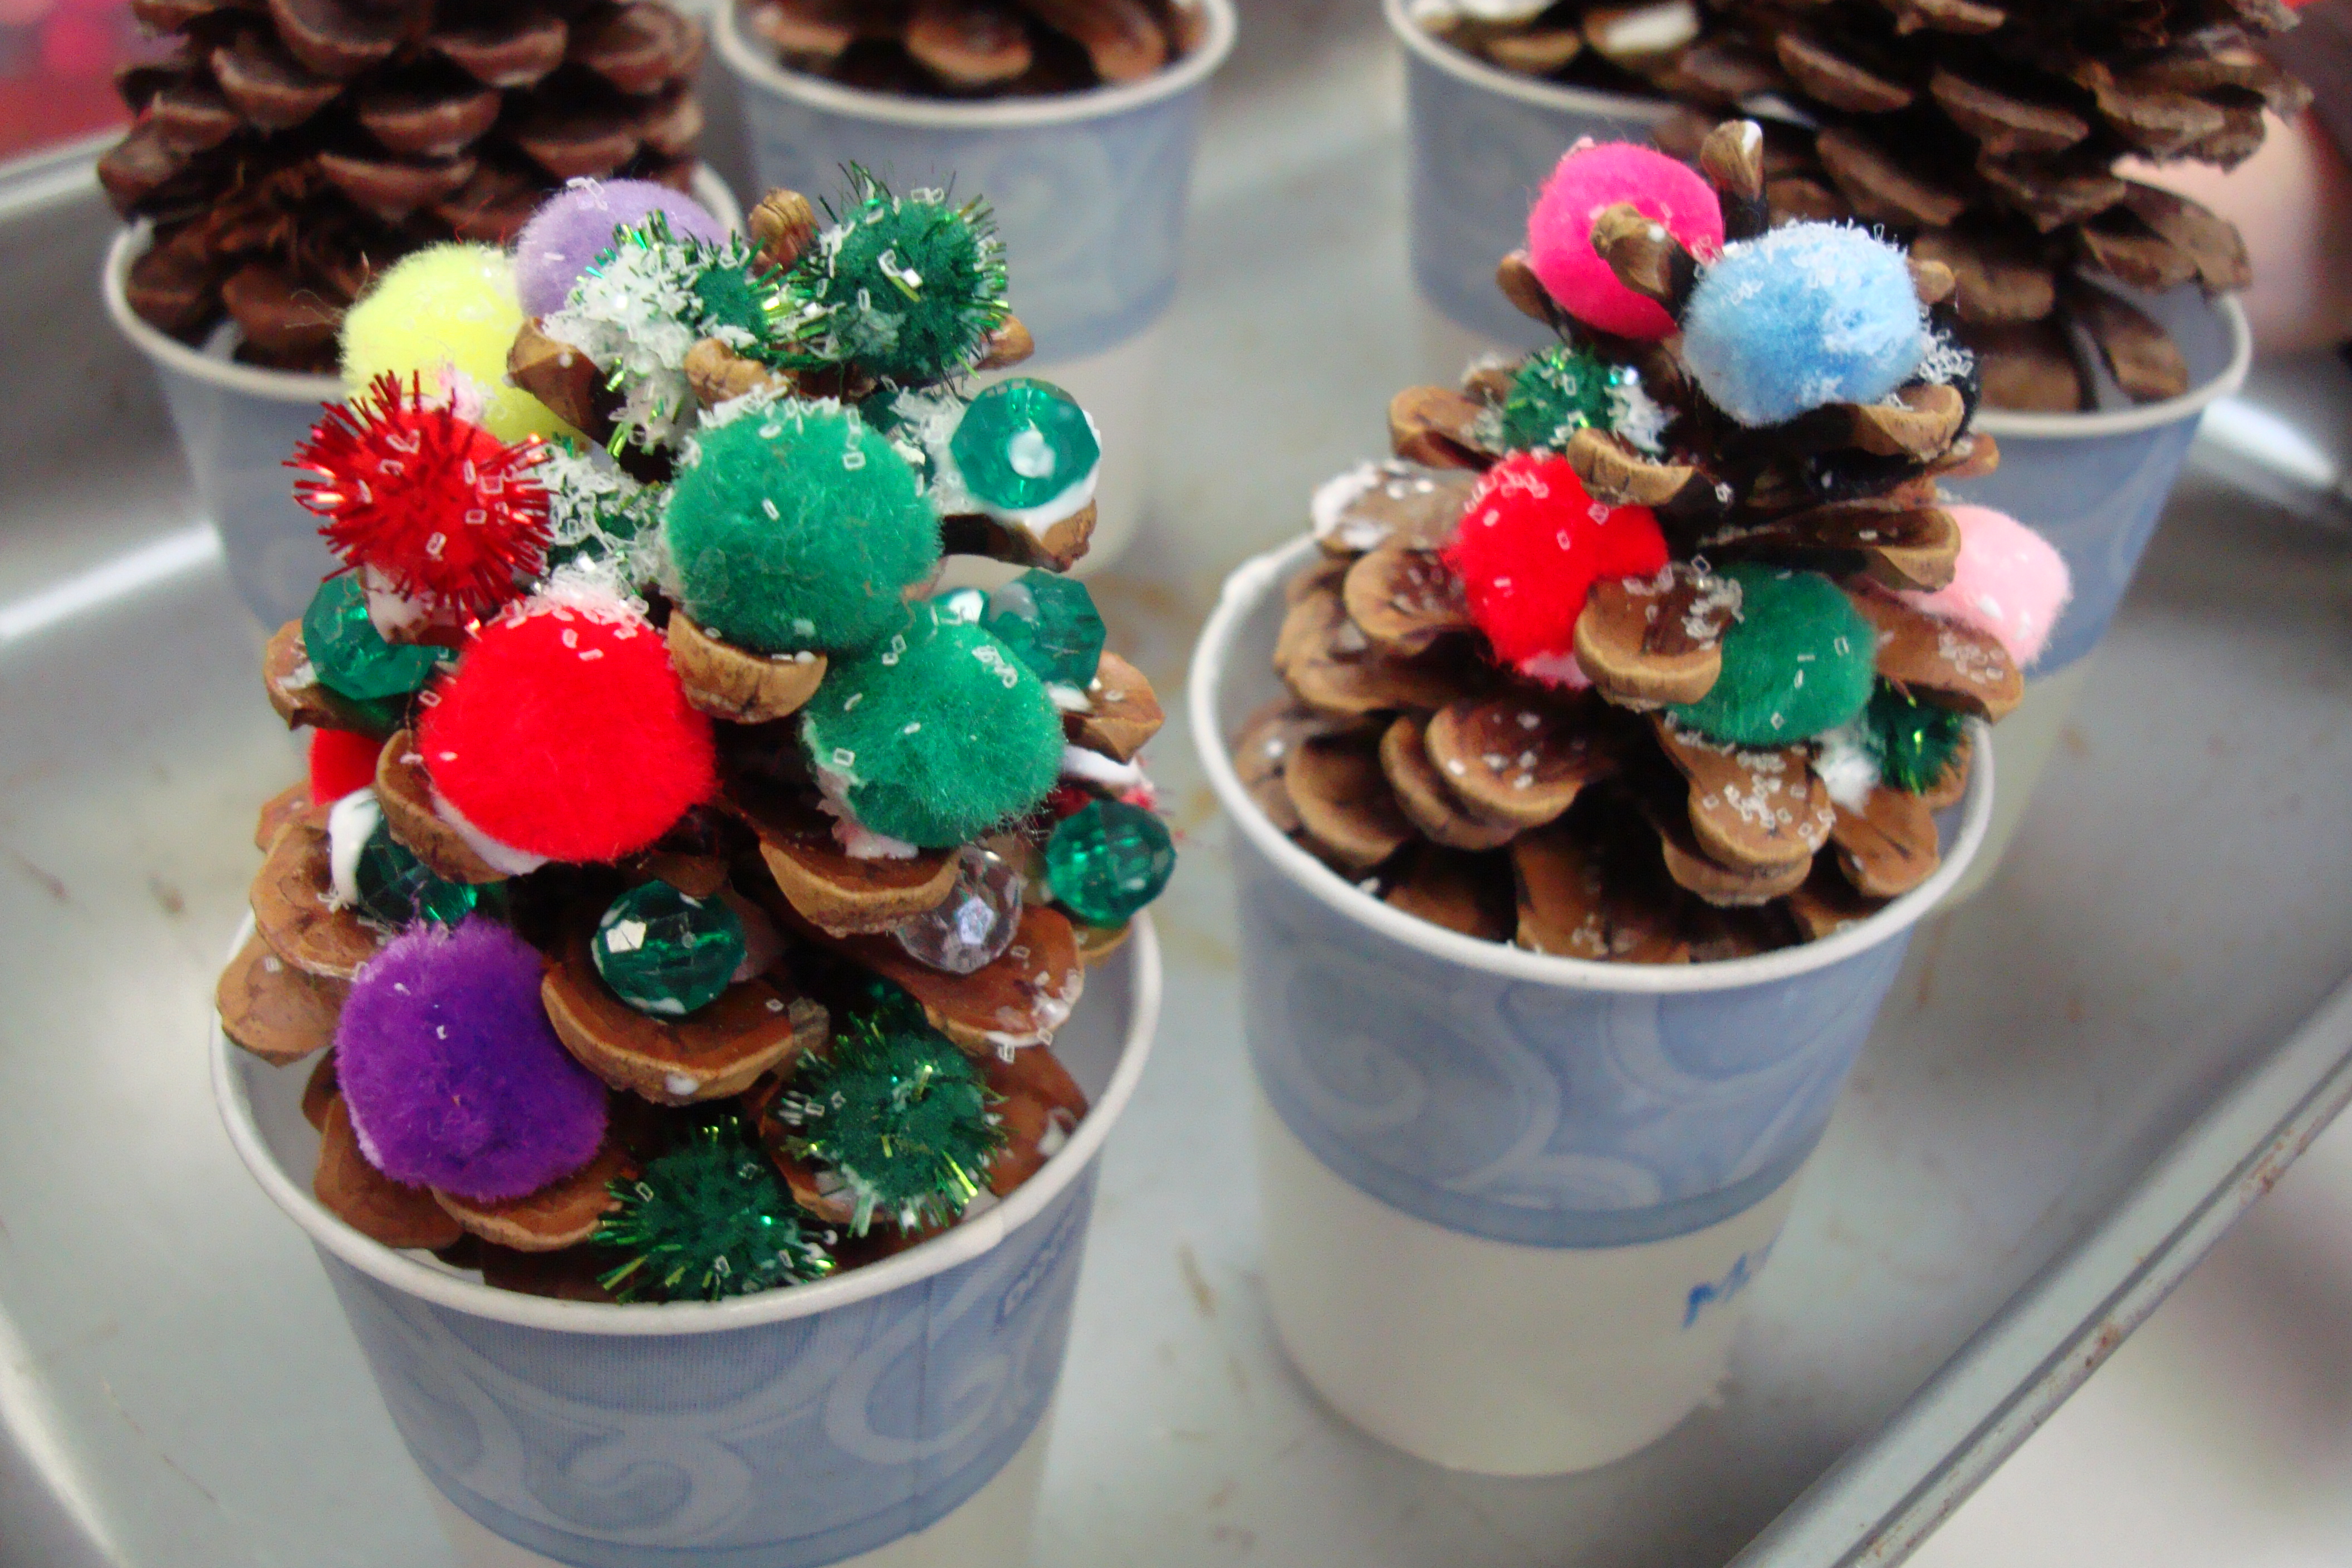
Nature tree

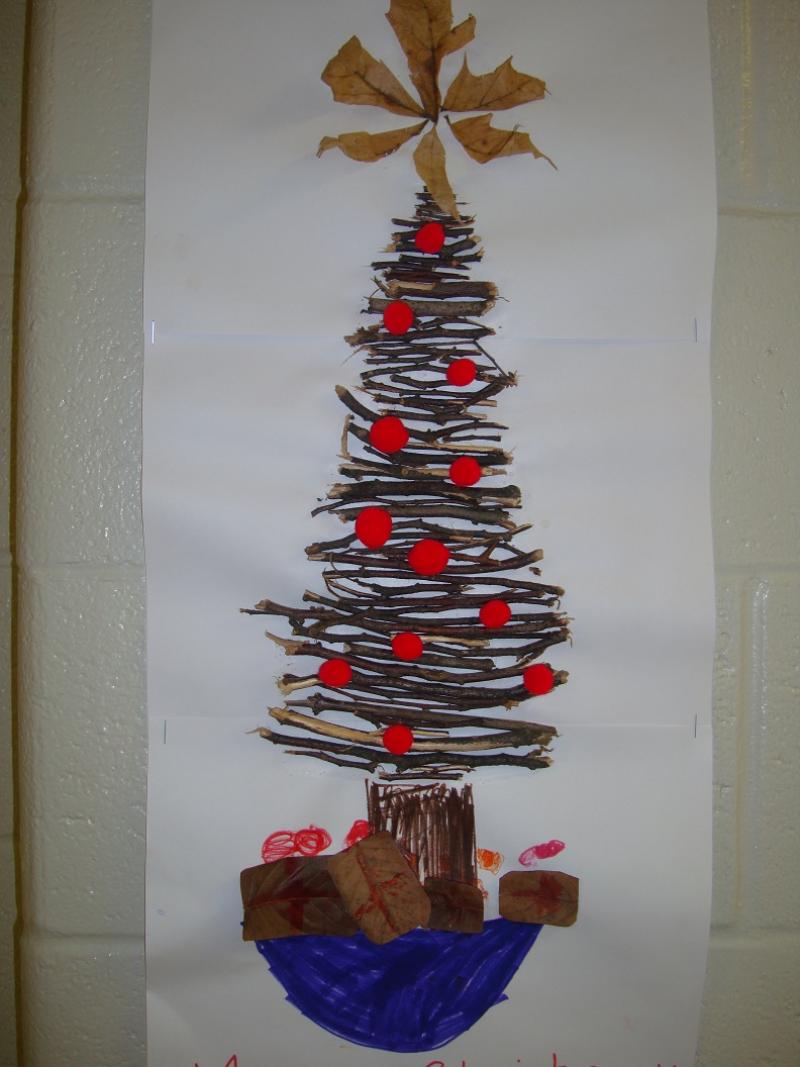
I love this tree made out of some items found outdoors! After going on a stick hunt, parents and teachers may need to cut some of the sticks so there are various size pieces. Children can work together to arrange the sticks in order to form a tree. Embellish with pom poms – and a star made out of leaves tops it off!

Shredded paper tree

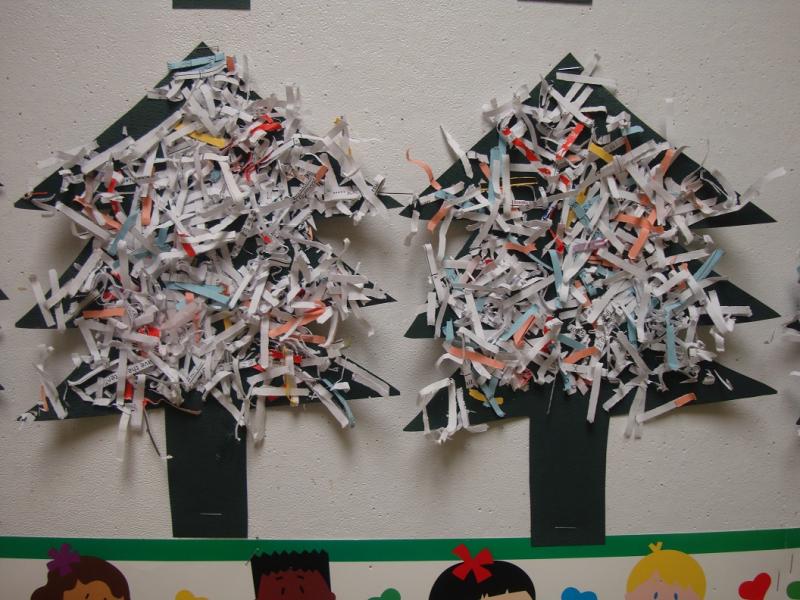
It’s great when you can use recycled materials in an art project. Here shredded paper is used to decorate this tree shape.

Large paper trees

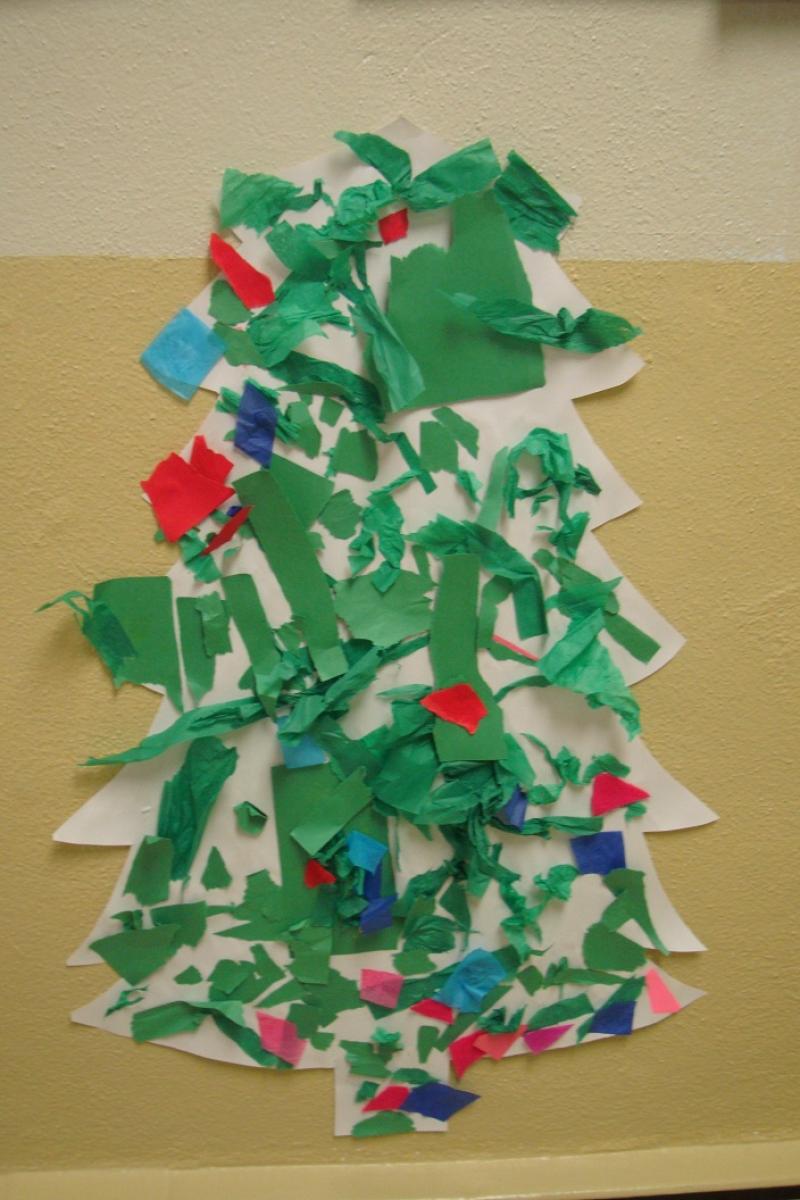
Children can tear and crinkle the paper to their hearts delight as they work together to fill in the space on the large tree cut-out.

Or try this … cut out large tree shapes out of easel paper along with some assorted shapes, like stars, out of colored construction paper. Have toddlers decorate their tree as they wish by drawing with markers or painting with paint on their trees.

Watercolor trees

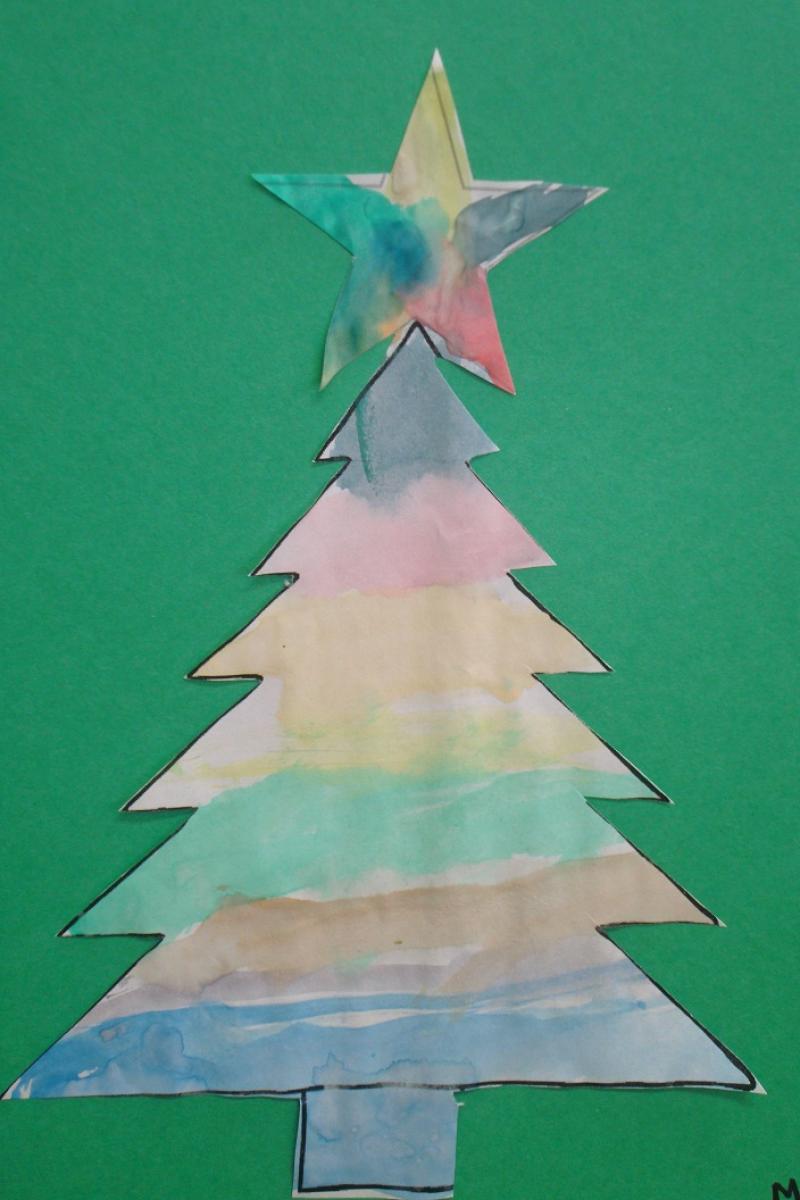
Using watercolors is a good fine-motor activity for children. We encourage the “wet-wipe-wiggle” method to watercolor painting to get the deepest colors (wet the brush, wipe the brush on a paper towel, wiggle the brush into the paint). Teachers can silhouette cut out the trees and mount onto construction paper once dry.

Paper plate trees

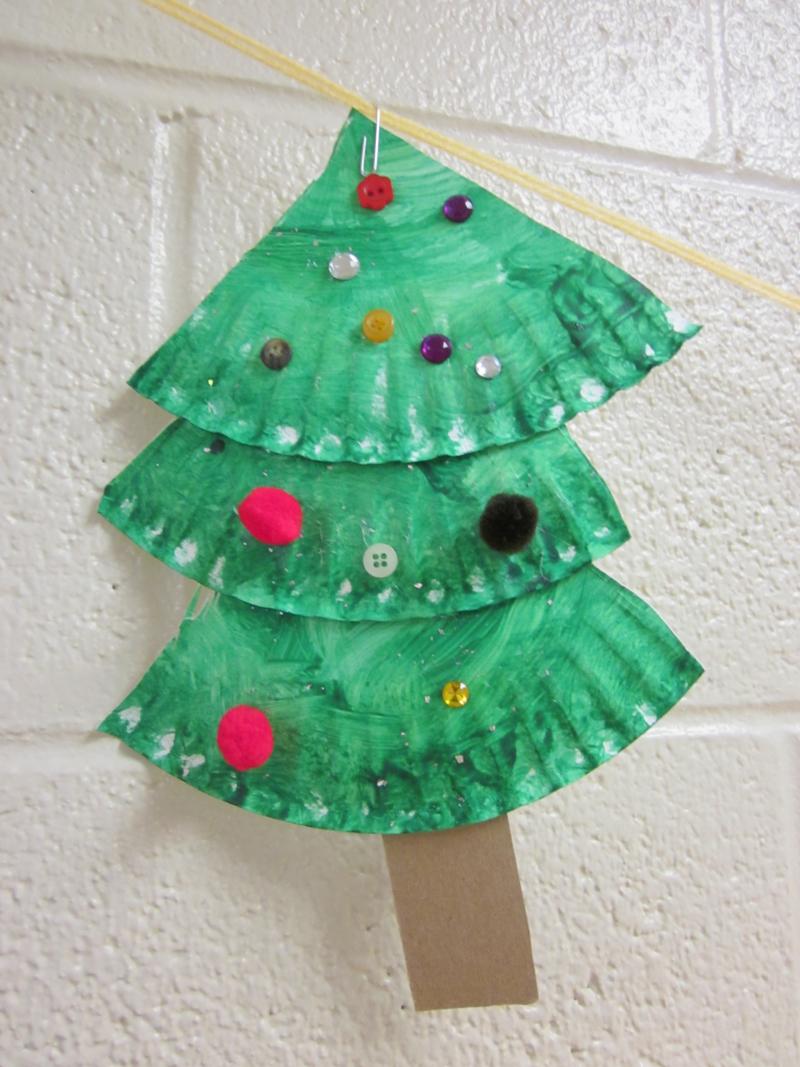
After painting a paper plate green and allowing it to dry; cut the plate into quarters and then assemble into a tree shape.

I hope you enjoyed this round-up of Christmas tree art!

treecollage

Seasonal shadow boxes

box2 As soon as I saw the nature shadow boxes from Teach Preschool – I just knew we had to do this! The idea of making a shadow box can be adapted to any season (winter, spring, summer, fall or for a certain holiday). Children can collect things from nature, bring in items from home or use collage materials from school. The shadow boxes we made here are Christmas themed.

First, we poured a layer of glue into each shoebox lid — that alone generated many “Oooohs” and “Aaaaahs” from the children! Next, we gave the children an assortment of Christmas themed items (such as small ornaments, candy canes, Christmas confetti, pine branches, etc). Oh yea … I still had some scented pinecones left over from another project, so we used those too! The children chose what items they wanted to put into their boxes.

Next, was the best part! The children were given green and red watered-down tempera paint in cups and they then dipped the paint into the glue. The children loved seeing the color spread as it went into the glue. This kept them busy for quite awhile! Some children chose to paint onto some of the items they put into the shoebox lid.

box1

Lastly, they sprinkled red and green glitter into their shadow box, for a sparkly effect! These take a good 3-4 days to dry fully (depending on how much glue you use). As the glue dries it turns clear (and you may not see much of the paint color) – but the process of painting into the glue was great for the children as they explored how the paint reacted with the glue.

Afterwards, you can use these as I-SPY boxes. (ie. “I-SPY something red”, “I-SPY a candy cane”, etc.).

What other types of shadow boxes could you make? What materials would you use?

Reindeer art for toddlers and preschoolers

toddlersHere’s an instructional video that we filmed for ehow.com that shows two cute reindeer projects that you can do with your toddlers and preschool-age children. You can read the instructions, and then view the video to see more.

Handprint Reindeer

The first project is a really adorable hand print craft that you can do with infants, toddlers, or preschoolers. Using brown washable paint, simply paint their hand, and have them make them hand print on a piece of colored construction paper or cardstock. Once it’s dry, simply silhouette cut around the hand print. And now, it looks like a face with the antlers. Add on some googly eyes and a nose, with glue dots or some tacky glue. You can use this cute reindeer as an ornament, or put a magnet on the back to hang on the refrigerator.

Toilet paper tube Reindeer

The next reindeer project is made out of a toilet paper tube. Beforehand you will need to cut a rectangular piece of brown paper the same height as your toilet paper tube. And then, you can have the child wrap it around, take some tape and attach to the tube to make the reindeer body. You can use some glue dots with some googly eyes and have the children stick those on, along with a red pom pom for the nose. And then, they can take a marker, they can decorate it any way they want to make the face.

For the antlers, help children take a pipe cleaner and that has been cut it in half, make a cross and then, wrap it around. Then, they bend each end up, so that it looks more like a W (view the video to see how this is done). The antlers then get taped onto the inside of the toilet paper tube, and you have your reindeer!

For a look at the projects — take a peek at the video!

Make your own Jingle bells

jingle stickReady for some homemade musical fun for the holidays? Time to recycle those little bells you have around the house or pick up a small pack from a local store and make your own jingling bracelets, anklets, belts or jingle sticks for thrifty family fun.

Although most folks think of jingling bells around Christmas time, you can hear them in a variety of folk traditions around the world. They are worn on the wrists and ankles of dancers from India, as part of belly dance clothing and also as part of Native American regalia. You can see them placed around the collars of reindeer up near the Arctic circle or on horses as they pull a “one horse open sleigh”. They seem to make everything they touch more graceful and musical.

Here are some ideas for making your own jingle bells.

WRISTS, ANKLES AND WAIST BELLS

Jingle bells of various sizes are available at practically any craft or sewing store. To make them into anklets or bracelets is simple. For the easiest project, begin with pipe cleaners in your favorite colors and wrap or twist the pipe cleaners stopping at regular intervals to string on a jingle bell. Stop when you’ve created the right length to fit your wrist or ankle. For a waist belt of jingles, keep twisting in more pipe cleaners and adding bells until you’ve reached the desired size.

If you braid or finger-weave (a finger and thumb type of weaving that is a bit like crochet), begin with yarn and string on the bells as you see fit. The result will look and sound great!

The nice thing about bracelets or anklets of bells is that it calls attention to movement. As a child moves his arms or legs or as a toddler dances, they can hear the sound and use their own body or arms or legs as an extension of the music instrument. It’s a great way to feel the beat!

JINGLE STICK

Start with a pencil and place one jingle bell in the middle of a pipe cleaner at the top of your pencil. Fold the two ends of the pipe cleaner down the sides of the pencils and begin to wrap with another pipe cleaner. Every so often, string a bell onto the sides of the pipe cleaner that are hanging down and then continue to wrap the pencil.

And then … play along with Jingle Bells or any of your favorite holiday music.

Have fun as you … JINGLE ALL THE WAY!jingle anklet

Award-winning children’s performer, DARIA (Daria Marmaluk-Hajioannou) has five cd’s that have won national honors. She has the most awesome job of traveling the world to sing for kids and peace. Her website; located at dariamusic.com, was given a 2009 Parents Choice Award for its musical and cultural content. Read more about Daria. Check out Daria’s website for free songs, song lyrics and more fun musical craft activities like this one.

Put a book on every bed

bookonbedThe other day I read this wonderful idea in the paper in the “Ask Amy” column. It was about a literacy campaign that she launched with the Family Reading Partnership called “A Book on Every Bed.” The idea is to put a million books at the foot of a million beds for a million children on Christmas morning. What a WONDERFUL idea! It’s a tradition I plan to start this year with my own children (two of which are well beyond the preschool years – but I think they will still get a kick out of it!) It is such a simple idea – and one that doesn’t even need to cost anything – the book you give can be one that is passed down. Here is the idea:

Take a book.

Wrap it.

Place it on a child’s bed so it’s the first thing the child sees on Christmas morning (or whatever holiday you celebrate).

That’s it.

A Book on Every Bed” is an appeal to spread the love of reading from parents to children. As early educators we know that a love of literacy starts EARLY. Children who are exposed to books and stories while they are young will be more likely to have a love of reading throughout their life.

What can we do help to put a book on every bed?? If you work at a preschool or child care center, how about ….

Holding a book swap with the families at your center

Collecting used books in good condition and donating them to a women’s shelter

Organize a Scholastic book fair and take your profit in books to donate

DO YOU HAVE OTHER IDEAS?? Please share them!


VIDEO: Amy Dickinson and Sahela reading

Image credit: Amy Dickinson and the Family Reading Partnership