Melting marshmallow snowmen in preschool

snowman

I saw these adorable snowman treats on The Amazing Mess blog – so I made a bunch for myself and bagged them up as small gifts. But then I thought – this was so easy and fun … the kids would LOVE this! And even though making these are fun (and tasty) – there were other ways to extend this activity so that the children learn a little something along the way, too!

Decorate your snowman

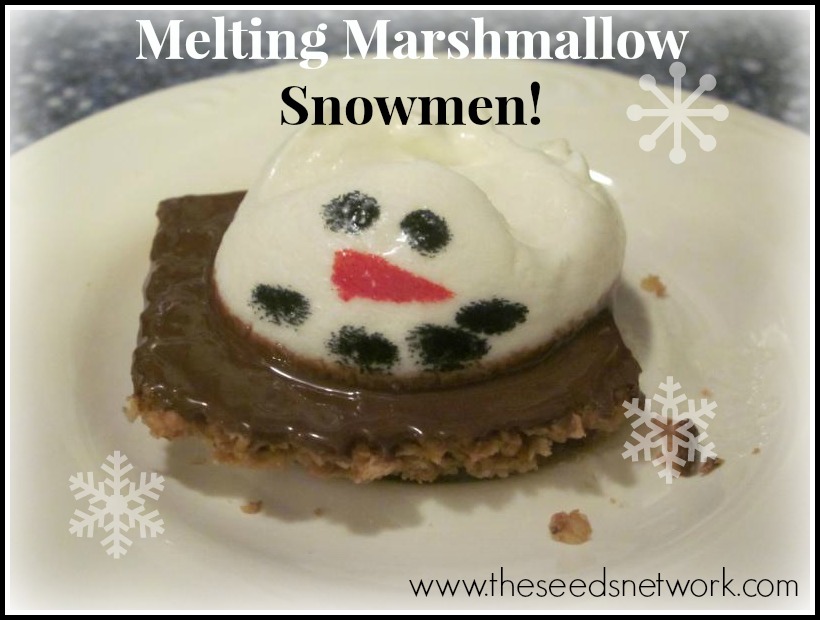
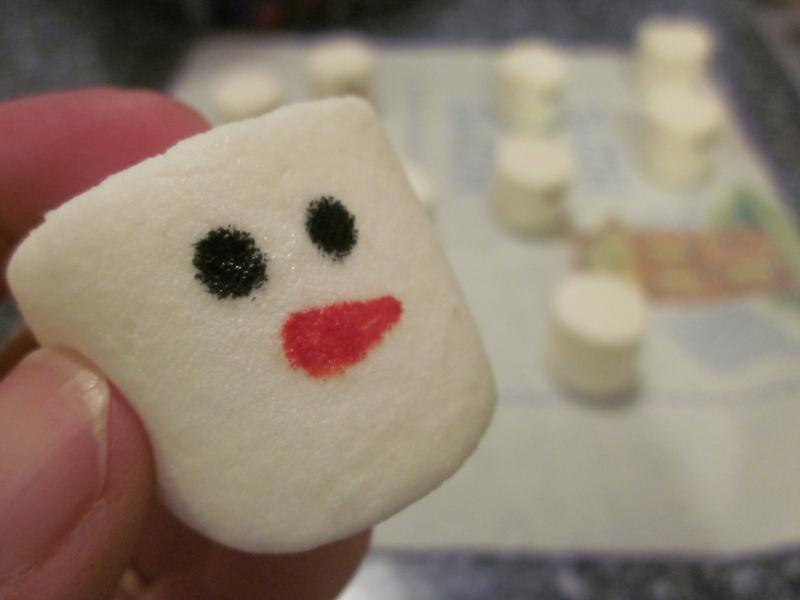
So first, here’s how to make the edible melting snowmen. Take a marshmallow and make a snowman face using food coloring markers (these are very easy for adults AND children to work with – and it’s edible).  You can find these in a local craft store that sells cake decorating supplies.

IMG2133.JPG.main.jpg (800×600)

Then, place it on top of one striped cookie (you can substitute other types of cookies, like graham crackers or nilla wafers if you do not wish to have any chocolate on the cookie – but for me, it’s ALWAYS about the chocolate! Ok, I digress!).

Extend the activity with a story

As I was making my snowmen I thought … what BOOKS could I use to go with these? Maybe a little backwards in my usually thinking (usually the book comes first, then the activity). But the main concept is the melting of the snowman, and there are lovely children’s books that go with this theme and can lead to further discussion. A few books I liked were The Smiley SnowmanWhere do Snowmen go?  or Snowmen at Night. You can have a discussion about what happens to snowmen when the weather gets warm (they melt) and talk about why that happens.

Watch him MELT!

Allow children to make their own marshmallow snowman and put it on top of one cookie. Then, ask them what they think will happen to THEIR marshmallow snowman if you put them in the microwave or oven. If their snowmen get hot, what will happen to them? And there you can touch upon the scientific concept of melting (properties of matter) and have them make predictions.

Next, SHOW them what happens by putting their cookie/snowman in the microwave for 10 seconds. When it comes out – it will be like a melted snowman! (They will really get a kick out of this!) . Top off with another striped cookie, and it’s time to enjoy!

Gift idea

These can also be put together as gifts for the children to give (or gifts you can make to give) by putting them in plastic baggies and attaching the melted snowman.

The tags are designed so that you can get 6 tags per sheet, and that when you attach them, the microwave instructions fold over the top of the plastic bag and display on the back.

Find more SNOWY ideas for preschoolers

Check out our Pinterest page!

PinterestSnow

Making scented pinecone Christmas trees

 pineconetree

We have been exploring “scents of the season” these past couple of weeks in preschool. As we get ready for Christmas, I saw these cute pinecone trees on The Wool Acorn blog, and I thought this would be wonderful for the children to make. But I wanted to incorporate a holiday scent for the children to explore … so we made sure our pinecones were scented!

I did intend to scent the pinecones myself (I really did!). The pinecones that were collected were a little damp and not yet open – so they were put them in a warm oven. They DID start to open … however the smell coming from the oven was not so pleasant, so we ended that process and ran to store to buy the pre-made scented ones. But I still do want to give this another try at some point (maybe after the pinecones dry out naturally). In any case, the store-bought ones had a lovely cinnamon scent. If you make them yourself, you can experiment with other scented oils.

DSC09252

So, we started off with having the children explore the scent and have them guess what the pinecones smell like. Some of the responses were “delicious” and “cookies” … other responses were “they smell like pinecones”.

DSC09259

Next, we placed the pinecones in a small paper cup (this helped to keep them upright while children were working on the project). It was also helpful because we could write each child’s name on their cup.

DSC09261

Then we poured a small amount of Tacky glue onto a paper plate. Tacky glue was a great choice for this project because it is thicker than regular white glue (so it’s less drippy). Also, children only need a small dab of Tacky glue and the items will stick very well to the pinecone. We showed the children how to take a pom pom (and other embellishments) and dip them in the glue – explaining that they only need a small dab. (Our 3-year old class still liked to put A LOT of glue on their pom poms!). This was great for fine motor practice. Then we had the children explore the materials and decorate their pinecone Christmas tree as they wished.

DSC09262

Once they are done decorating, we had them take a Q-tip and dip it in the glue and spread the glue around the edges of the pinecone. Lastly, have children got to sprinkle some white “snow” glitter on top.

DSC09264

The children still liked smelling their pinecone trees after they were finished!

DSC09258

Turkeys, teepees and being thankful preschool

Visiting my favorite local preschool this week, I had to stop and take some pictures of the fabulous Fall fun setup in the classrooms!  Take a peek and see some of the fun ways they explore Thanksgiving all month long.

Thankful Turkey

I love, love, love this turkey that is hung in the preschool hallway, where the feathers are comprised of EVERYONE’S handprints!  And by everyone, I mean this was a total school effort, with all classes from infants to school-age, teachers and staff contributing their handprints to the final product.

20141107_14462420141107_144603


Pilgrim and Native American Living in Dramatic Play

Want to setup a tent or teepee in your dramatic play area for Thanksgiving, but don’t have the space?  Look at a creative solution using sheets from Miss Julia!  You only need a small corner  to create this interesting and inviting space.

20141107_145251


Some items you can include for play and exploration, pumpkins, gourds, dried flowers, acorns, photos, and rocks with native american drawing symbols and words.

20141107_144853

20141107_144728

20141107_144916


Thankful Tree

Another beautiful idea from Miss Julia is her mini-Thankful Tree!  She encourages participation from children and families by having the tree right near her check-in area, so that everyone can contribute to the tree by writing what they are thankful on a leaf to be hung on the tree.

20141107_145309


How do you prepare your classroom for Thanksgiving?  What are your favorite ideas?

Easter pop-up cross art

easterPopUpCross

Celebrate the true meaning of Easter by making this 3-D craft, showing the cross of Christ on a grassy hill.

Beforehand, fold a paper plate in half and then cut along the inside circle only half way.

easter2

Unfold the plate, and then you can lift up the cut-out notch and fold it up to look like a hill.

easter3

Have children cut up small squares of green paper (or cut them beforehand, for younger children).  Also cut two strips of brown paper to make the cross.

Children can color the “hill” with a green marker, crayon or paint and then glue green “grassy” pieces at the base of the hill.

easter1

Lastly, children can glue and assemble their cross and glue it to the pop-up hill.  Add a scripture verse about Easter, and/or the words “Jesus died for sin“..

Happy Easter!

Focusing on love and kindness during the holidays

candle

Holiday time is a very exciting time for students attending school!   Whether they are infants and toddler, preschools, or school-age children, the holiday time is filled with anticipations and tradition.  Through my years of teaching, I have had to be conscious and sensitive to cultures and beliefs and ensure that my teachings did not cause anyone to feel uncomfortable.

When I taught in a public school, I had to make sure that I did not bring religious beliefs into the room.  When I was a Director of a religious-based program, we shied away from the commercialization of the holiday season. I can recall being very cautious and particular when it came to book and music choices for my lesson plans.  I wanted to be sure that I would not offend anyone.  I know many teachers who sometimes struggle with the holiday season because there are, in fact, so many beliefs and cultures; no teacher wants any family to feel left out.

How can a teacher effectively celebrate all holiday traditions at an age appropriate level? 

At the end of the day though, regardless of culture and religion, I believe that holiday time is a wonderful opportunity to simply teach our children about how to love others.  No matter what the culture or religious belief may be they all originate from a place of love and respect.  Teaching children to be kind, respectful, and giving are lessons that are not only celebrated this time of year, but are reinforced and modeled all the time.

The holiday time of year definitely creates a stage for early educators to review and highlight ways in which we can show love towards others.  So don’t stress this holiday season, bring it back to basics, and simply teach your students how to give the greatest gift of all to each other…..LOVE!

Here are a few ways to teach children how to show love and kindness for others.

  1. Draw a picture for a friend.
  2. Make cards for those in nursing homes or hospitals
  3. Have a food, clothing  or toy drive
  4. Teach children how to give compliments and build each other up
  5. Have families share their holiday traditions, through pictures, food, visits
  6. Listing things you like about each student in the class.
  7. Listing things your class is thankful for
  8. Sing songs about friends and love to other classrooms and parents
  9. Work on full classroom projects that involve everyone’s contribution
  10. Teach your students how to tell  friends and family members “thank you” and “I love you

Share some ways you teach your preschoolers about love and kindess below!

Stackable Christmas trees

treesI love, love, LOVE the story “Mr. Willowby’s Christmas Tree”! It’s a great seasonal story about how one BIG Christmas tree became a gift for many people and animals. The rhymthic flow of the story is fun to read, and when I read it to my kids or in class, they love how the top of the tree gets a “snip”!

Mr. Willowby’s Christmas tree Came by special delivery.
Full and fresh and glistening green—
The biggest tree he’d ever seen.

The Story

In the story “Mr. Willowby’s Christmas Tree“, Mr. Willowby’s tree was so tall, it couldn’t stand up straight in his parlor. Mr. Willowby asked his butler to chop off the top of the tree. And through the rest of the story, we follow the treetop as it gets shared. I searched for a fun activity that preschoolers could do to go with this story. I wanted something special that went with the story – and found this stackable tree idea from Bella Dia.

The  Activity

This activity provides children a tangible way to see how you can take ONE part of a tree and break it down into smaller trees. It demonstrates how shapes can be used to build upon each other to make something bigger or smaller – and how shapes can be used to create other shapes. Beforehand, I constructed one stackable tree to use as I read the story. Each time Mr. Willowby’s treetop gets a chop … I took a piece off tree, so the children can see how the one big tree can be broken down into smaller parts. It really got their attention to see me take a piece of my paper tree off each time Mr. Willowby’s treetop got a snip!

Afterwards, the children got to make their own stackable tree. First, I cut 4-6 half circles of various sizes out of green construction paper. Each child got 1 set of the half circles to decorate as they wished with stickers and markers (you should use only flat embellishments, so that the tree will stack properly).

IMG2357.JPG.th

Once the children have decorated their tree, I showed them how the 2-dimensional half circle can be curled/folded to create a 3-dimensional cone shape and taped it to secure. After doing this for each of the half circles – the children had fun stacking and unstacking their own Christmas tree! And it was a great way for them to remember the story!

I’m sharing this post with two great blog hops:

Read.Explore.Learn at JDaniels4’s Mom – visit to see great book choices and activities to go with them!

AND

Visit Debbie Clement’s Happy Birthday Blog Hop (Rainbows Within Reach)! Stop by and wish Debbie a “Happy Birthday” and visit all the fun ideas that are linked up below!!

IMG2374_JPG_main

Oh the many ways to make Christmas trees in preschool

Christmas tree


Oh Christmas tree – so MANY WAYS to make a Christmas tree in preschool! From tissue paper to egg cartons, sticks to straws – there are so many different materials that can be used to make Christmas Tree Art projects. And lots of learning that can take place in the process – creative expression, counting, sequencing, fine motor development … so here’s a round-up of some really creative trees that can be made with infants to kindergarteners!


Easy TriangleTrees

Perfect activity for toddlers and young preschoolers to express their creativity! Give them some pre-cut triangle shapes in various sizes and have them put together a tree on a piece of paper, and then embellish with sequins. The “not so perfect” tree shapes are priceless!

Infant Mistletoes

This is such an adorable Christmas keepsake!

Stackable trees

I have the children make these trees after reading “Mr. Willowby’s Christmas Tree”. They get four different size semi-circles to decorate. After decorating, we turn the half circles in cone shapes and then stack the (good sequencing activity to go from largest to smallest cones to stack).

Egg Carton trees

Older preschoolers and kindergarteners can use recycled egg cartons which they cut, paint and arrange to form a tree.

Christmas Tree of Straws

Children will get some great fine motor practice cutting the straws into all different sizes. They can then work to arrange the straws from longest on the bottom to shortest on the top to form their tree.

Nature tree

I love this tree made out of some items found outdoors! After going on a stick hunt, parents and teachers may need to cut some of the sticks so there are various size pieces. Children can work together to arrange the sticks in order to form a tree. Embellish with pom poms – and a star made out of leaves tops it off!

Shredded paper tree

It’s great when you can use recycled materials in an art project. Here shredded paper is used to decorate this tree shape.

Large paper trees

Children can tear and crinkle the paper to their hearts delight as they work together to fill in the space on the large tree cut-out.

Or try this … cut out large tree shapes out of easel paper along with some assorted shapes, like stars, out of colored construction paper. Have toddlers decorate their tree as they wish by drawing with markers or painting with paint on their trees.

Watercolor trees

Using watercolors is a good fine-motor activity for children. We encourage the “wet-wipe-wiggle” method to watercolor painting to get the deepest colors (wet the brush, wipe the brush on a paper towel, wiggle the brush into the paint). Teachers can silhouette cut out the trees and mount onto construction paper once dry.

Paper plate trees

After painting a paper plate green and allowing it to dry; cut the plate into quarters and then assemble into a tree shape.

I hope you enjoyed this round-up of Christmas tree art!

treecollage

Seasonal shadow boxes

box2 As soon as I saw the nature shadow boxes from Teach Preschool – I just knew we had to do this! The idea of making a shadow box can be adapted to any season (winter, spring, summer, fall or for a certain holiday). Children can collect things from nature, bring in items from home or use collage materials from school. The shadow boxes we made here are Christmas themed.

First, we poured a layer of glue into each shoebox lid — that alone generated many “Oooohs” and “Aaaaahs” from the children! Next, we gave the children an assortment of Christmas themed items (such as small ornaments, candy canes, Christmas confetti, pine branches, etc). Oh yea … I still had some scented pinecones left over from another project, so we used those too! The children chose what items they wanted to put into their boxes.

Next, was the best part! The children were given green and red watered-down tempera paint in cups and they then dipped the paint into the glue. The children loved seeing the color spread as it went into the glue. This kept them busy for quite awhile! Some children chose to paint onto some of the items they put into the shoebox lid.

box1

Lastly, they sprinkled red and green glitter into their shadow box, for a sparkly effect! These take a good 3-4 days to dry fully (depending on how much glue you use). As the glue dries it turns clear (and you may not see much of the paint color) – but the process of painting into the glue was great for the children as they explored how the paint reacted with the glue.

Afterwards, you can use these as I-SPY boxes. (ie. “I-SPY something red”, “I-SPY a candy cane”, etc.).

What other types of shadow boxes could you make? What materials would you use?

Reindeer art for toddlers and preschoolers

toddlersHere’s an instructional video that we filmed for ehow.com that shows two cute reindeer projects that you can do with your toddlers and preschool-age children. You can read the instructions, and then view the video to see more.

Handprint Reindeer

The first project is a really adorable hand print craft that you can do with infants, toddlers, or preschoolers. Using brown washable paint, simply paint their hand, and have them make them hand print on a piece of colored construction paper or cardstock. Once it’s dry, simply silhouette cut around the hand print. And now, it looks like a face with the antlers. Add on some googly eyes and a nose, with glue dots or some tacky glue. You can use this cute reindeer as an ornament, or put a magnet on the back to hang on the refrigerator.

Toilet paper tube Reindeer

The next reindeer project is made out of a toilet paper tube. Beforehand you will need to cut a rectangular piece of brown paper the same height as your toilet paper tube. And then, you can have the child wrap it around, take some tape and attach to the tube to make the reindeer body. You can use some glue dots with some googly eyes and have the children stick those on, along with a red pom pom for the nose. And then, they can take a marker, they can decorate it any way they want to make the face.

For the antlers, help children take a pipe cleaner and that has been cut it in half, make a cross and then, wrap it around. Then, they bend each end up, so that it looks more like a W (view the video to see how this is done). The antlers then get taped onto the inside of the toilet paper tube, and you have your reindeer!

For a look at the projects — take a peek at the video!

Make your own Jingle bells

jingle stickReady for some homemade musical fun for the holidays? Time to recycle those little bells you have around the house or pick up a small pack from a local store and make your own jingling bracelets, anklets, belts or jingle sticks for thrifty family fun.

Although most folks think of jingling bells around Christmas time, you can hear them in a variety of folk traditions around the world. They are worn on the wrists and ankles of dancers from India, as part of belly dance clothing and also as part of Native American regalia. You can see them placed around the collars of reindeer up near the Arctic circle or on horses as they pull a “one horse open sleigh”. They seem to make everything they touch more graceful and musical.

Here are some ideas for making your own jingle bells.

WRISTS, ANKLES AND WAIST BELLS

Jingle bells of various sizes are available at practically any craft or sewing store. To make them into anklets or bracelets is simple. For the easiest project, begin with pipe cleaners in your favorite colors and wrap or twist the pipe cleaners stopping at regular intervals to string on a jingle bell. Stop when you’ve created the right length to fit your wrist or ankle. For a waist belt of jingles, keep twisting in more pipe cleaners and adding bells until you’ve reached the desired size.

If you braid or finger-weave (a finger and thumb type of weaving that is a bit like crochet), begin with yarn and string on the bells as you see fit. The result will look and sound great!

The nice thing about bracelets or anklets of bells is that it calls attention to movement. As a child moves his arms or legs or as a toddler dances, they can hear the sound and use their own body or arms or legs as an extension of the music instrument. It’s a great way to feel the beat!

JINGLE STICK

Start with a pencil and place one jingle bell in the middle of a pipe cleaner at the top of your pencil. Fold the two ends of the pipe cleaner down the sides of the pencils and begin to wrap with another pipe cleaner. Every so often, string a bell onto the sides of the pipe cleaner that are hanging down and then continue to wrap the pencil.

And then … play along with Jingle Bells or any of your favorite holiday music.

Have fun as you … JINGLE ALL THE WAY!jingle anklet

Award-winning children’s performer, DARIA (Daria Marmaluk-Hajioannou) has five cd’s that have won national honors. She has the most awesome job of traveling the world to sing for kids and peace. Her website; located at dariamusic.com, was given a 2009 Parents Choice Award for its musical and cultural content. Read more about Daria. Check out Daria’s website for free songs, song lyrics and more fun musical craft activities like this one.